News
E.S.P. Sew Along: OK Pleats For Real This Time June 01 2016

Okeedoke. Onto the topic of skirt fullness and pleating. The E.S.P. pattern has a skirt softly gathered at the waistline a ratio of 2:1 fullness. This means for every one inch of the waist measurement, there are two inches of skirt.

Gathering the skirt at the waistline creates a certain amount of bulk depending on the ratio and the heaviness of your fabric. To achieve the luxurious look of a fuller skirt without added bulk at the waistline, PLEATS! Pleats might have a bad rep for being harder to do than straight gathering. And yes, there are more steps to the process but it is TOTALLY doable even for someone newer to sewing.
Our preferred fullness ratio for a pleated skirt is a 3:1. To get this number, we measure the waist edge of bodice front after the darts are sewn and minus the seam allowance, and then multiply that number by three. For the Skirt Front on the size 40 we need a piece that is 19" x 3 or 57" wide. For each Skirt Back, we need pieces that are 10" x 3 or 30" wide. For the length, you can work from the pattern piece (it is just at or above the knee so if this is too short for your taste, use the skirt length from a pattern you like.)
We cut our Skirt Front piece at 57"x 25" and our two Skirt Back pieces at 30"x 25" each. Next, we transfer our skirt markings (pocket position on the side seams and zipper position on the center back seam). We will be doing one direction knife pleats, but there are lots of pleating options. The Yellow Spool has a very clear tutorial on three different pleats: knife, inverted box and box.
For this dress, we made fewer pleats that are fairly deep. This is not a surgically precise way of making pleats. But it doesn't matter because no one will be measuring the pleats on your dress when you are finished. The goal is to make them appear uniform. If they are off by 1/8" or 1/4," it won't be noticeable. If free wheelin' gorilla pleating sets off your OCD, then the math version is to divide the waist front measurement by the number of pleats you want (this gives you the depth of each pleat.) Repeat for the back using an even number so you can have the same number of pleats on either side of the center back zipper.
Laying out the skirt front (right side down), we first marked the seam allowances.

Measuring from the seam line, we place a pin at the distance our our chosen pleat depth of 1 1/2" (Pin A), followed by a pin at 3" (Pin B) Repeat this configuration all the way across the Skirt Front piece and the two Skirt Back pieces.
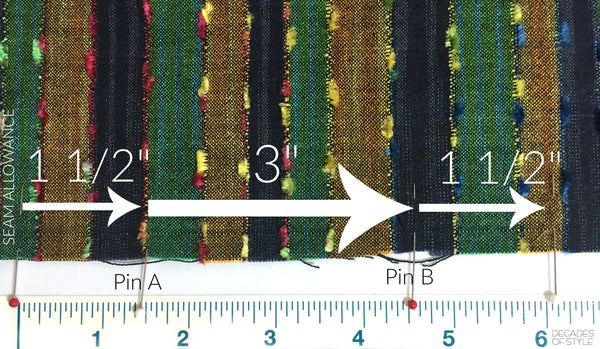
When you bring Pin A to Pin B, you will get a knife pleat that is 1 1/2" deep.

The pleats should abut one another with no spacing between.

There was a bit of unpinning and redistributing to get the fabric worked down to the waist line but any unevenness is not noticeable.

Other gathering and pleating options:

From left to right: 2:1 gathered, 3:1 gathered, 4:1 box pleated (too much fabric to gather), 3:1 pleated changing direction at the Center Front (box pleat) and Center Back (inverted box pleat).
Next up: Sleeves!