News
Hilde Hat Sew Along Part 4 - Finishing July 14 2023
Hilde Hat Sew Along Part 3 - Bind that Brim July 14 2023
Hilde Hat Sew Along Part 2 - Lining and Brim Stitching July 14 2023
Hilde Hat Sew Along Official Part 1 - Let’s sew! July 14 2023
Hilde Hat Sew Along Introduction July 14 2023
Welcome to the Hilde Hat sew along! We are so happy you are joining us!If you’ve never made a hat before, don’t be anxious because it’s just sewing. No wires involved, perhaps there is a Pellon product you have never used before but we all know how to fuse interfacing to our pieces so it’s going to be fine.This installment is just going to be a quick introduction covering suggested fabrics and the aforementioned Pellon products. The suggested fabric list is pretty short, “light to mid weight to canvas. Avoid heavy or bulky fabrics.“ Other mid weight fabrics (bottom weight) with a stable weave will work. The seam allowances in the pattern are 3/8” so if your fabric frays very easily (like linen), the project will be challenging.
If you’re wondering if apparel fabric that is more dress weight or shirting weight, like regular quilting cotton or oxford cloth will be suitable, the answer is not really. It's a bit like looking for the Goldilocks weight of fabric; not to light, not too heavy, but just right.
Quilt cotton or other lightweight fabrics are suitable for the lining.
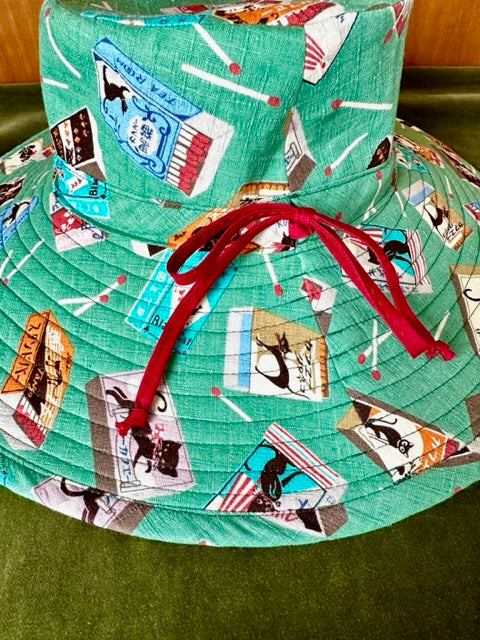
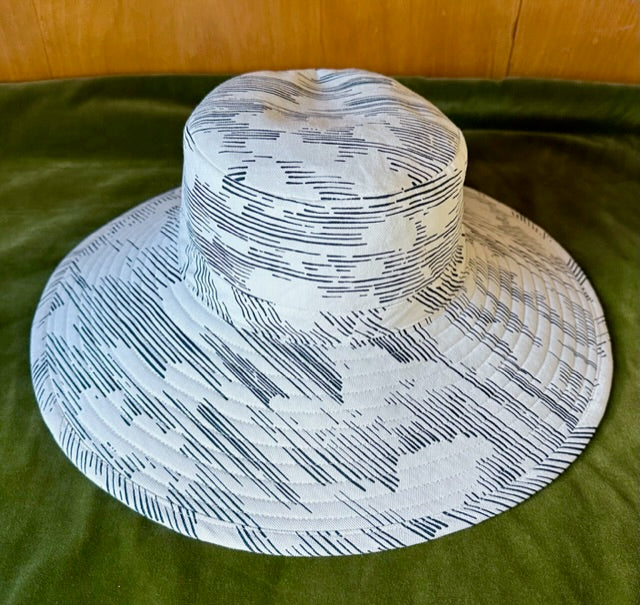
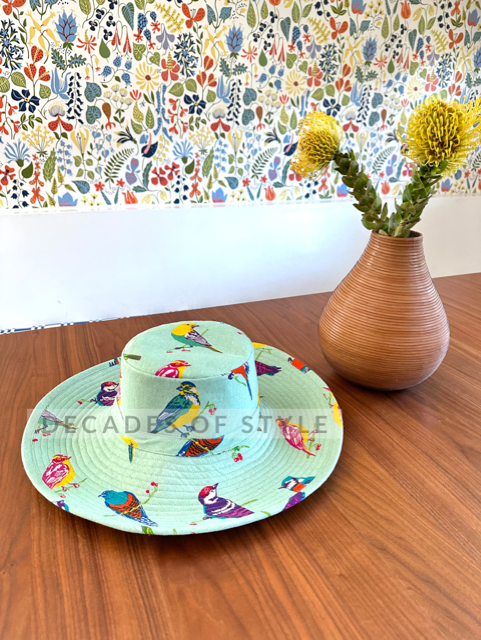
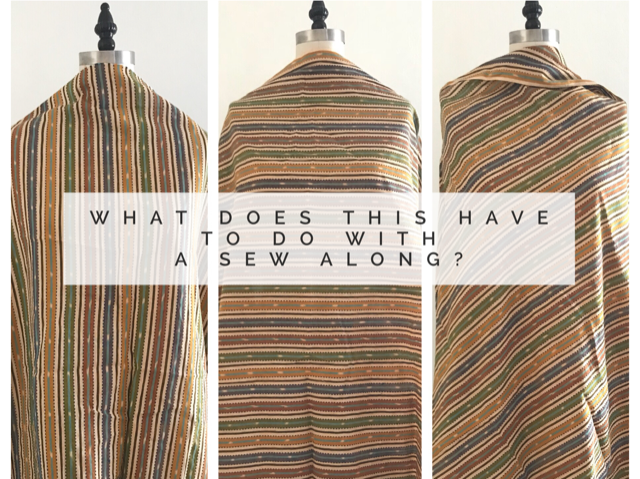
No matter how tempting it is to use a heavy weight fabric or heavy weight canvas, try to resist because it will be more difficult to sew. Also, the fit will not be as expected due to the extra bulk of the heavy fabric in the seam allowance. We know this firsthand from our many rounds of testing on this pattern!Japanese linen canvas fabrics are the perfect weight for this project - tested and confirmed! And you’re not going do better in terms of whimsical prints if you go this route - see three photos below! You can find Japanese fabrics at independent fabric stores like Stonemoutain and Daughter Fabrics, Harts Fabrics and Bolt Fabric Boutique;


The cotton canvas at Joann Fabrics - 44” wide and $12.99/yard regular price - is another option with large selection of prints available. This fabric is technically in their decorator section but it is just right! Shop Joann's Cavas selection. The solid cotton duck in the Joann decorator department is also an option. This fabric comes with a very heavy duty coating of sizing. If you are not pre-washing the cotton duck, you probably won’t need the layer of interfacing in the brim.
Fabric brands like Ruby Star and Cotton and Steel usually have a light weight canvas included in their quilting cotton collections so there are many options.
You can successfully use a large scale print for the project but it’s probably best to stick to an abstract design. (Also, it helps to buy extra yardage of a large scale print so you have more leeway in how you cut your fabric.) The photo below show 1 yard of a large scale print canvas. The repeat on this fabric is almost overwhelming! But keep reading and see how it works beautifully for the pieces of the hat.

One helpful way to envision how a print will ultimately work in your project is to use the paper scraps from the pattern to make a template. The template simply creates a “frame” of exactly what part of the print will show.

Below are 3 different choices of fussy cutting that fabric to show the crown of the hat.

As you can see, it can be surprising and delightful the way a large scale print parses in the hat pieces.


If you have recognizable elements in a large scale print, such as flowers, leaves or animals, you will most likely only see parts of any one element on the hat pieces. So depending on the scale, not a whole flower, only a cropped part of it. Use your template to help you fussy cut to maximize the effect of the fabric. 

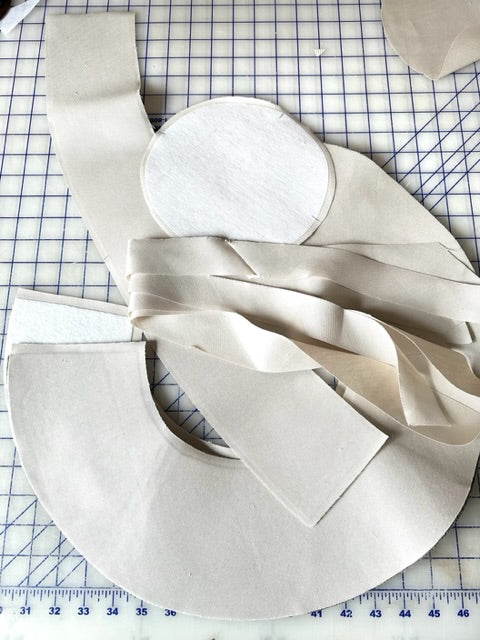
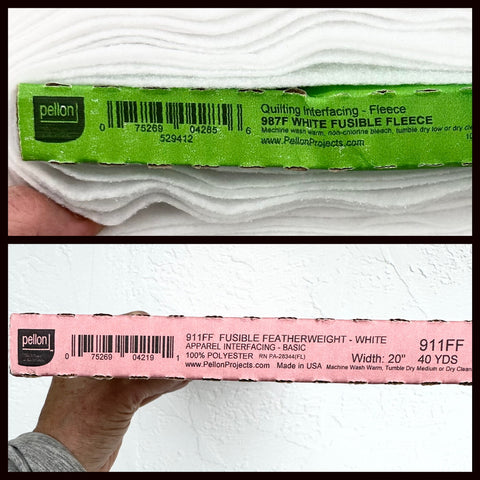
The pattern specifies exactly what Pellon products to use. If you want to use other products, go ahead if you want. Just know ahead of time that WE DON’T KNOW if your substitutions will work. We just don’t. If you email us to ask if "X or Y" will work instead of the fusible fleece, the answer is WE DON'T KNOW. There are times to "shop your stash;" we don't think this is one of them. If you shop the sales and/or use coupons, the fusible fleece and interfacing is not difficult to find and not that expensive. You will end up saving in the long run if you use what the pattern says. Photo shows the exact products specified in the pattern.
Find yourself some fabric, get your Pellon products and we'll start sewing in the next installment.
TLC Sew Along Part 4 - Machine Stitching the Home Stretch May 09 2018
Click here to read previous installment.
We're on the home stretch now! In spite of the somewhat time consuming detail of the reverse facing, this Caftan can zoom along quite quickly after that because the rest of the contstruction is done by machine (with a wee bit of hand basting to facilitate one step.)
Next in the construction is to attach the Side Panel to the bodice/skirt assembly. Start by turning the Side Panel right side out. Your bodice/skirt assembly should be inside out. Slip the Side Panel inside the bodice/skirt assembly and match up the shoulder seams and reference marks. (If this caftan looks off to you in terms of length, remember we shortened View B by about 12 inches to make a tunic length version.)

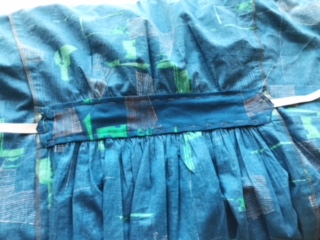
The Waist Insets go in between the notches marked on the pattern piece.

Stitch the Side Panel to the bodice/skirt assembly. There might be a bit of easing to be done along the bodice part of the seam.

Pivot at the small circles and stitch around the perimeter of the pocket.


Clip the seam allowance above and below the Pocket and press the Pocket towards the center front. Press the rest of the seam towards the Side Panel. (somehow, we did not end up with photos of this part! Sorry!)
On to the Waist Inset Facings. We'll show you our work attaching elastic to one end of an Inset Facing piece. You'll need to do these steps to finish both the Front and Back Waist Facings.
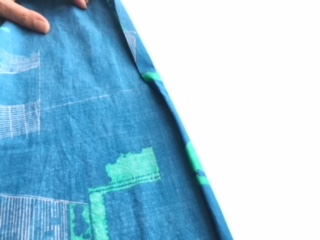
Turn in the 5/8" seam allowance all around the Waist Facing (the end of the seam gauge is 5/8" and makes for a quick check for accuracy).


Now turn under the tips of the seam allowance across the short ends to create a straight edge as shown.

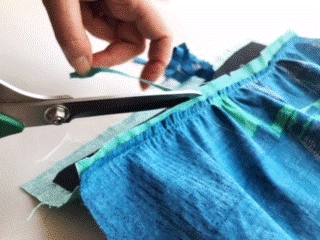
Cut your length of elastic into 4 equal pieces and slide the end of one piece under that straight edge.

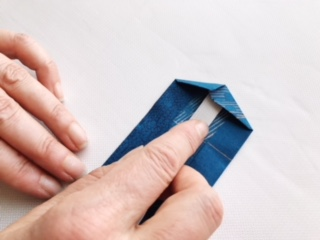
Edge stitch the straight edge through all layers securing the elastic in place.

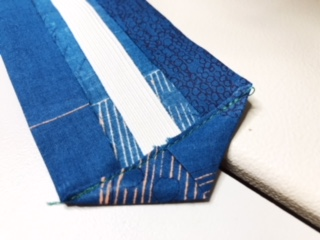
Flip the elastic towards the point at shown.

Stitch from the right side securing the elastic to the point. Pretty much any configuration of stitching will do. The goal is to have that tip of the Waist Facing stitched to the elastic.

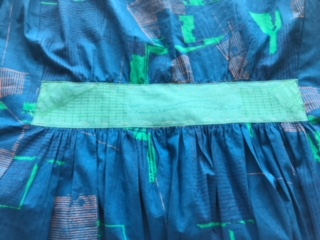
Once you have attached the elastic to each end of the Waist Facings, turn the caftan inside out and place the Facing over the corresponding Waist Inset. We are working with the Waist Facing Front in these photos.
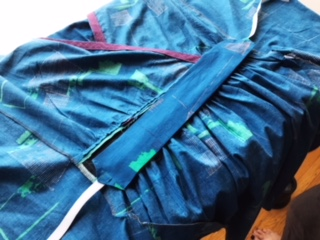
Pin the Waist facing in place matching the center fronts. The folded edges of the Waist Facings should just cover the seams from the Waist insets.

Even though hand basting seams like a pain, it is the best way to do this step. It is worth the small bit of time to hand baste the Waist facing in place.
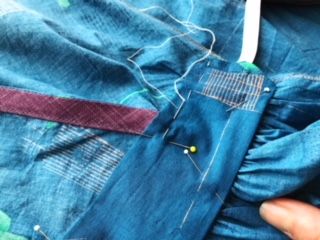
Sorry for the change up but the photos now switch to the Waist Inset BACK. Here is the Waist Facing basted in place.
Working from the right side of the garment, edge stitch the Waist Facing through all layers. Take care to keep the elastic (or twill tape) free from the stitching.

It will look like this from the right side:
On the inside, the edges of the Waist Facing should be secured and it will look like this:

You can remove the basting stitches now.
All that is left is to make a quick machine hem and secure the elastic at the sides. Feel free to hem the caftan by hand if you prefer. The instructions call for a 5/8" hem but this is only a suggestion. You can put in a deeper hem if that is what you want.
Turn up 5/8" and turn the raw edge down into the crease.
Stitch close to the fold.

Try on the caftan and pin or tie the elastic at the inside the caftan to your preferred snugness at the waist. Mark the elastic.

Overlap the elastic, aligning the marks and stitch together.


You're done! Enjoy!

TLC Sew Along Part 2 - Skirting the Issue May 07 2018
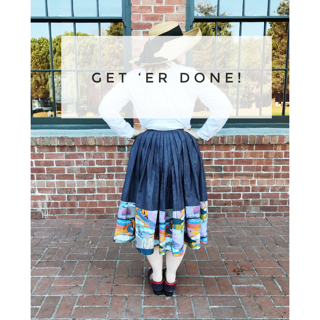
Get 'er Done (Part 6 - Final Post) November 01 2017
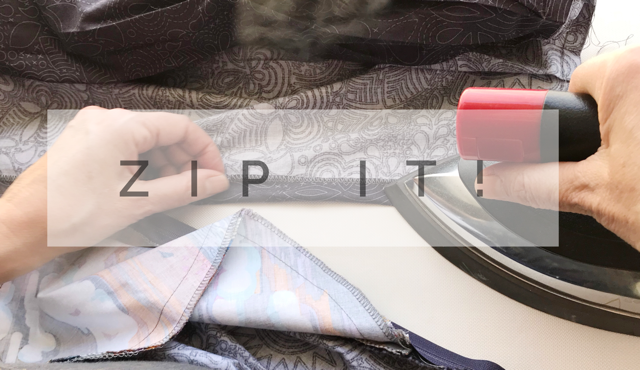
Zip It! Part 5 October 29 2017
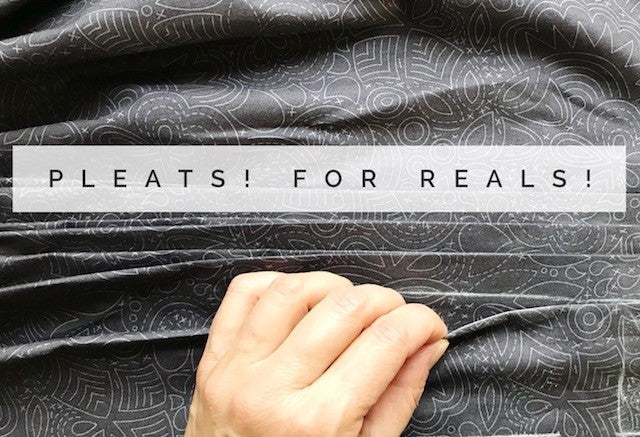
Pleats! For Reals! Part 4 October 23 2017
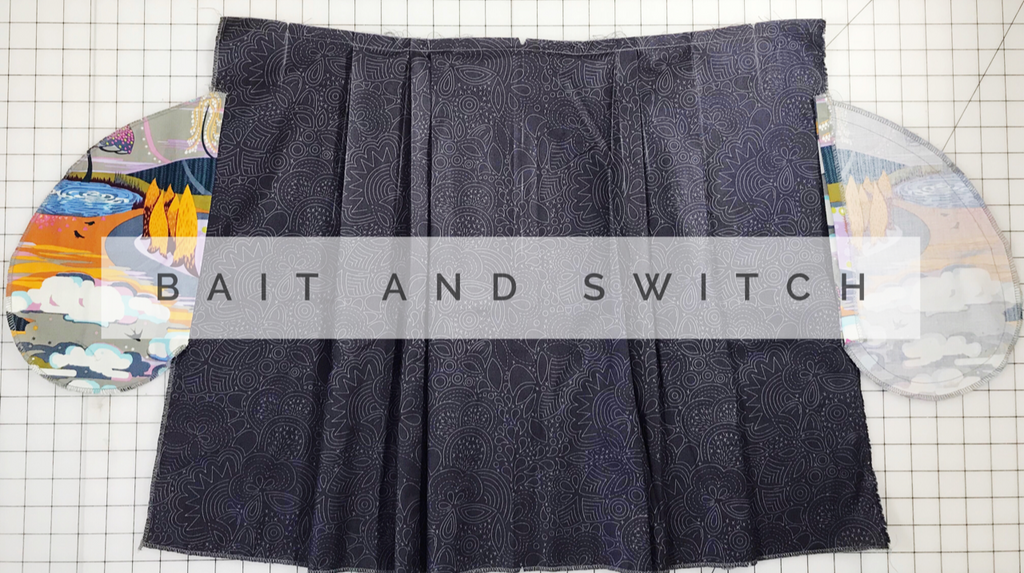
Bait and Switch (Part 3) October 22 2017
Odds and Ends - At the beginning! Part 2 October 18 2017 3 Comments
A Sew Along is Announced! Part 1 October 12 2017
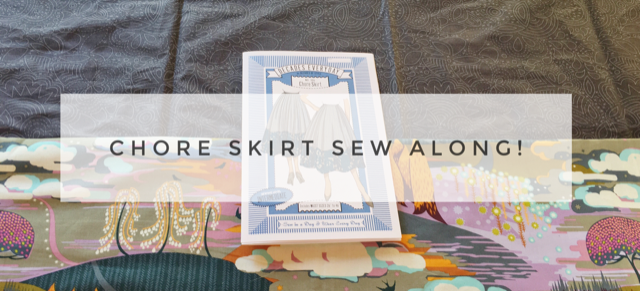
Admittedly, the Decades blog has been a seriously neglected child for most of this year. We're going to rectify that with a Chore Skirt Sew along. Please tell anyone you think might be interested! This is going to be fun and in the end, you will have a very cool skirt! If you need to purchase the pattern, just click on the image below.

We don't have a specific schedule for this sew along. We will try to get something posted every week or even twice a week if possible. You guys can work at your own speed and the posts will be here for you to read at your leisure.
So here we go! Let's talk a bit about fabric selection for this project. The list of suggested fabric on the pattern cover includes:
- cotton (quilting cotton is fine. Don't choose anything too heavy - you'll see the explanation for that below)
- mid or lightweight rayons
- seersucker
- double gauze
- shirtings
- lightweight ikat
- chambray
- fine wool suiting
- tropical weight wool
It seems a bit like an everything-but-the-kitchen-sink fabric list! Ultimately, fabric choice for the upper skirt is determined more by bulk and weight of the fabric over any other characteristics. At the center back of this skirt, there are 4 layers of the fabric in stacked pleats. Those 4 layers are bound with the waist binding creating a total of 6 layers at the center back.

There are MANY fabrics not listed in the suggested fabrics that you could use for the upper skirt. The best way to determine if a fabric will work is to stack up 6 layers of the fabric you are considering and see how bulky it is. Let that be your guide in choosing the upper skirt fabric.
The Skirt Band at the bottom of the skirt does not have any construction elements limiting your fabric choices. So far, we have stuck to using fabric that is similar in weight and drape to the upper skirt and have been pleased with the results. You can use fabric that is a bit heavier or bulkier than what you choose for the upper skirt and everything will still work out fine. Something like velveteen or corduroy could really make for a lux bottom band! Striped silk blend suiting next to cotton velveteen shown below can give you an idea of how striking that could be!

Hopefully one of you will give that a try and let us know how you like it!
In the interest of actually getting this sew along off the ground, we'll end here with some inspiration photos.


The upper skirt on this yellow beauty is made from a textured mystery cotton. It had a bit of bulk to it but is worked out fine in the end. The Bottom Band is a hypnotizing ikat that came from Turkey.
Your assignment for the next post is to choose your fabric! And then choose your pattern size based on your waist measurement. Trim or trace your pattern pieces as you like and cut out the skirt. It doesn't take long; it is mostly simple rectangles.
Next time we'll cover piecing the Skirt Front and Front Band for sizes 14 and up (for 44" fabric) for those who have never come across this in a pattern before. And we'll touch a bit on the importance of stabilizing the waist edge of the skirt.
Thanks for joining us!!
Click here for the first installment in The Sew Along.

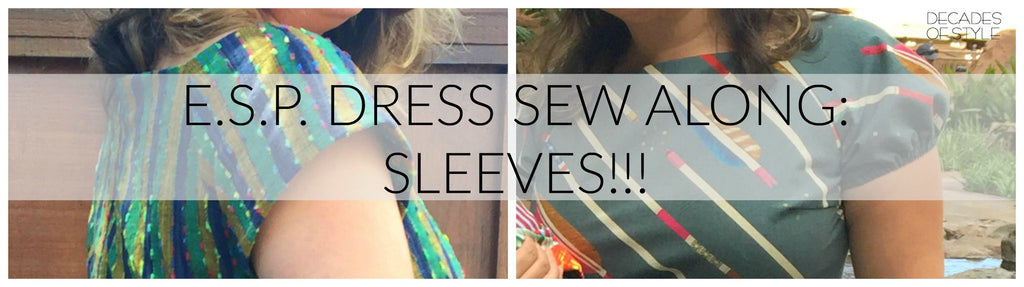
E.S.P. Pattern Hack: 3/4 Length Sleeves November 15 2016 1 Comment
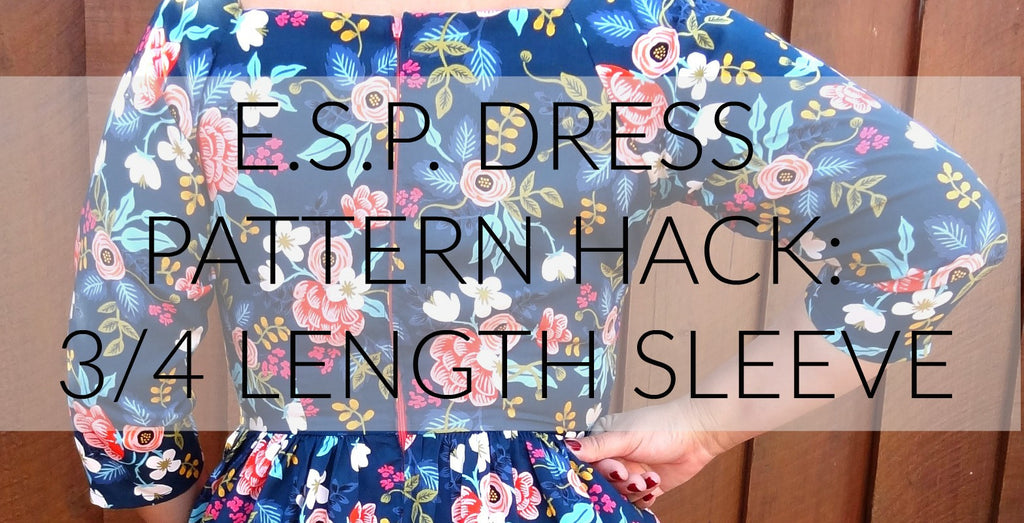
The E.S.P. Dress is one of our most versatile patterns because once fitted, the pattern can be a base for many different variations. We have covered how to alter the gathered skirt into pleats, shorten the sleeves and even make the dress sleeveless on previous posts. Now that the weather in the Northern hemisphere has turned colder, it's a good time to hack this TNT pattern for fall and winter.
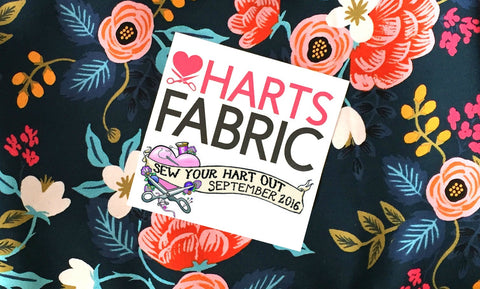
We have had a few requests on our blog regarding making the short, wide raglan sleeve into an elbow length or 3/4 sleeve. When Harts Fabrics in Santa Cruz invited us to write a guest blog tutorial for Sew Your Hart Out September, it was the perfect opportunity and venue for it! If you missed the tutorial back then, here it is!
Cotton + Steel via Harts provided us with a lovely Les Fleur Birch Floral rayon by Rifle Paper Co. This fabric is like buttuh, both the hand and drape.
To alter short sleeves into a longer sleeve using the slash and spread technique, you’ll need these supplies:
Clear 2” ruler, we like Collins’
Pattern paper - it must by transparent enough to see the printed pattern through it so tissue and architecture paper can also work
Tape
Pencil and pen
Paper scissors
Fabric for muslin/mock-ups
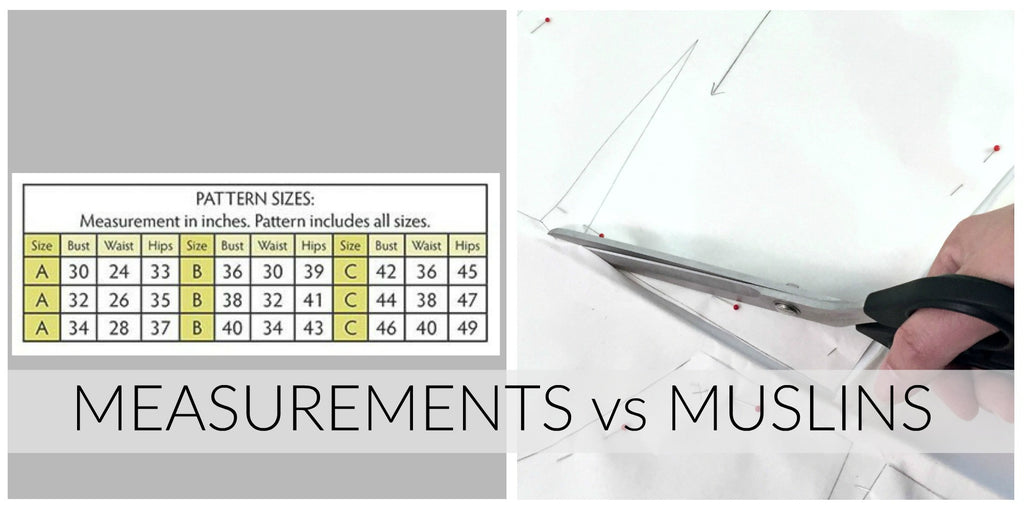
Begin by tracing the sleeve pattern in your determined size - see our post on measurements vs. muslins for more information on determining your size. Transferring all markings and cut it out. We will not be changing the armscye, so all of the pattern alteration will take place below that. To begin, use the ruler and draw a line - Line 1 - across the sleeve, perpendicular to the grain and at the bottom of the armscye.
Draw two more lines 1” apart from the top line - Line 2 and 3. Line 3 should be right before the sleeve bottom begins to curve. Cut along these lines. You now have four pattern pieces. We labeled the pattern pieces 1-4 to make sure we didn’t mix them up.
Slide a piece of pattern paper underneath pieces 1-4. To determine your desired sleeve length and circumference, take measurements from any existing garment that is a good fit for you. (Measure the underarm seam for the length and the circumference of the opening at the bottom of the sleeve.) We apologize, but now you have to do math. Start with your desired finished sleeve length and subtract 3. Then divide that number by 3.
You will be inserting that amount between each section to achieve your desired length.
We spread the pieces 3 3/8” apart and taped them to the paper underneath. It is easiest to measure and tape one piece at a time. Tissue paper tears easily, so you may want to use artist rather than painter’s tape. Trim any excess paper from back and sides.

Now the pattern piece is longer but still a really wide bell sleeve. Draw a line from the sleeve dart to straight down the pattern piece past Line 1. This will be your guide to reassembling the pattern piece after you’ve tapered it. To taper the sleeve, first cut away the pattern piece at Line 1 and set aside the top section. Divide the remaining piece into five by drawing four lines approximately 4” apart that are parallel with the grain line marking.

We’ll mark these pieces alphabetically. Now things start to get fun. Now you will need your finished circumference measurement that you got from an existing garment. Measure the width of the sleeve pattern at line 4 (minus the seam allowance) and subtract the finished circumference from that. Then divide that number by 4. This gives you your overlap amount. Cut along the vertical lines separating pieces A-E, keeping 1/8” at the top uncut. Overlap the pieces at the bottom by your overlap amount. For this project we overlapped by about 2” between each section and taped them together.

On top of a new piece of paper, align the top part of the sleeve with the newly tapered bottom part of the sleeve using the line you drew as a guide. Tape down the pieces in place to the new paper so that the new paper fills in the voids created by tapering the sleeve. Trim excess paper.

To eliminate the curve at the bottom of the sleeve, draw a line that runs to each edge at the bottom. We add a piece of pattern paper that is the same width and 1” long to create the hem allowance. Flare out the hem allowance at each side to match the flare of the sleeve above.

Now it’s time to test our pattern with a quick muslin of the top. We used a lightweight rayon for our muslin. We marked on our muslin a curve at the outside elbow to make the sleeve hang more elegantly. We transferred those changes on our newly altered sleeve.

Then a last muslin to make up and check our sleeve. Perfect. Be sure to bend your arm to test the fit at the forearm. If you find you need to add a little bit of width to the sides at the forearm, slide that pattern paper under and add what you need - sometimes just a 1/4” on either side is just enough.

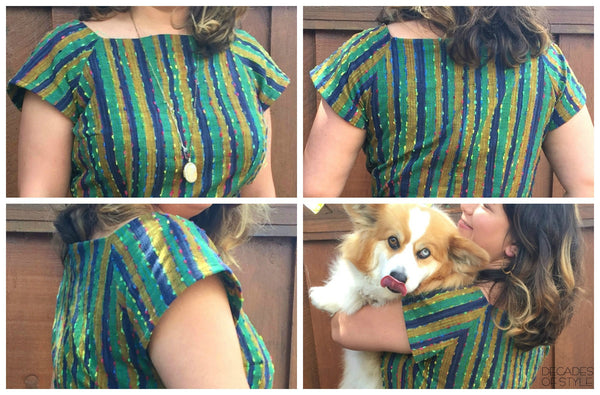
The E.S.P. dress comes together easily. The only changes we made to the order of sewing the dress was to hem the sleeve before attaching them to the dress. Turn up the fabric 1/2”, press, then turn up another 1/2” and press, pin and sew.

The finished dress is breath of floral prettiness! Thanks for sticking it through our long tutorial. The E.S.P. dress is really wonderfully versatile and fits even full busted beauties with proper adjustments. We did a Full Bust Adjustment and Sway Back adjustment on this E.S.P. dress as well. Details on how to do these can be found on on our E.S.P. Dress Sew Along Week 1 post. We’d like to thank Harts for letting us guest blog for giving us a chance to create this tutorial!

E.S.P. Dress: Getting It Done July 26 2016 1 Comment
Just when you were thinking the E.S.P. dress was going to be an eternal UFO (unfinished object), here is the last installment of the sew along. We could go on and on about the fun things you can do with the E.S.P. dress, but we released a new pattern, the Cats Cradle dress, and we want to get to that sew along as soon as possible. Lets run though one more pattern adjustment that you can make and a few details of finishing the E.S.P.!
Sleeveless E.S.P.
A bit more work but a fun alternative for hot summer days. You will not be needing the bodice facing pieces for this adaptation.
Things you need:
1 yard of 1" wide bias. We prefer to make our own bias as purchased bias tape can be hard to manipulate. Feel free to use some fun contrasting fabric as no one will see it... unless you want them to.
2 yards of 3/8" - 1/2" ribbon or make your own tie.
Cut the bodice front and back with an additional 3/8" at the top of the neckline. Stay stitch the armscye a scant 5/8" from the edge.
Sew your bodice darts, attach the skirt to the bodice front and back. Measure 9" from the top of the bodice back down the center back and clip into the seam allowance, about 5/8" (to the seam line). Turn in the seam allowance 1/4" then again 3/8" and sew down. Or, if you have a serger, overlock the center back seam and turn and sew it down. The zipper will now start 9" below the neckline. Insert the zipper to the center back.

Trim the armscye seam allowance 3/8". Now, fold the free edge of the bias about 1/4" and press (the pressing really helps here). Attach the bias, right sides together using a 1/4" seam allowance, to the armscye, trimming any excess at the ends. Grade the seam allowance of the bias. Then turn bias along the seam line toward the inside of the bodice and stitch 1/8" near the fold. Need a super detailed tutorial on this technique? Victory Patterns has a lovely tutorial on bias finishing edges which can be applied to making a sleeveless dress.
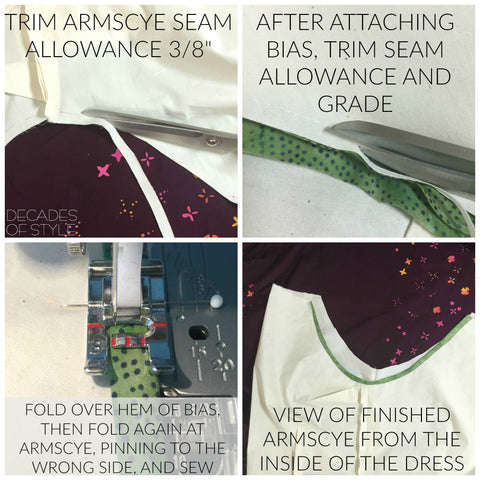
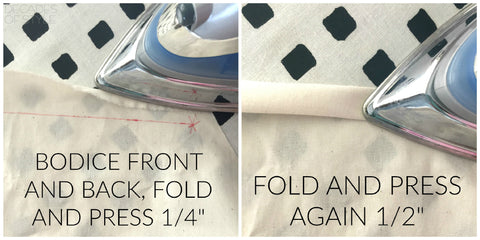
Fold and iron neck line of the bodice front and back 1/4", then again 1/2", pin and sew down, sewing a scant 1/8" from the hem line. You have just made your neckline casing.
Now thread the neckline casings with your ribbon having it start and finish at the center back.
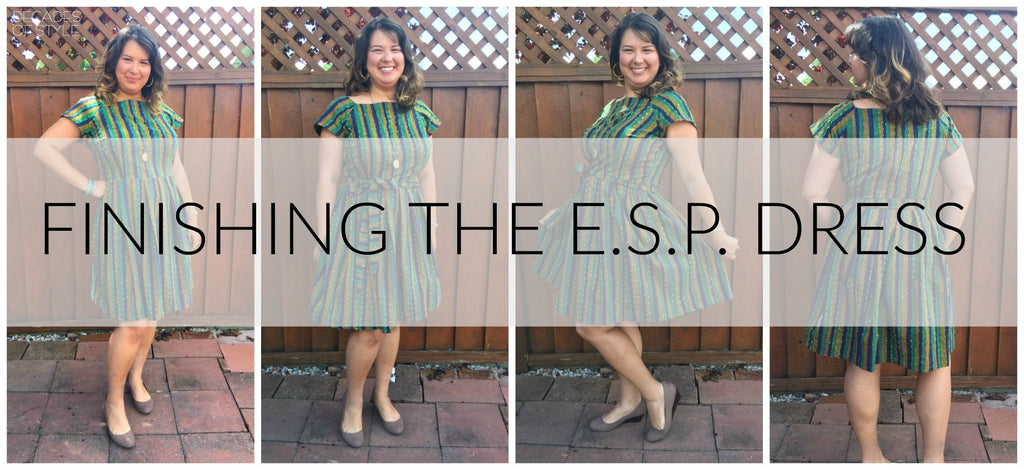
Finishing Your E.S.P. Dress
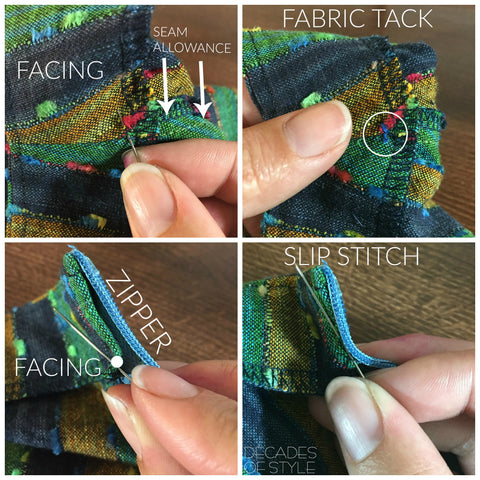
If you are finishing the dress without any adjustments, you'll be attaching the facings and hand tacking them to the seams. While some find facings fidgety, we like the vintage technique of hand tacking. You could hand tack them all around, using a prick stitch if you really don't like loose facings. Using a slip stitch to sew down the facing at the zipper make the stitching invisible.
Hemming the skirt is simple as it is all straight (no fussy curves here). The E.S.P. is meant to be hemmed 2" for a 23" skirt. You are welcome to make it longer or shorter as desired.

To accessorize, we made a sash from our leftover fabric. Check out Tanya's tutorial on making a self fabric belt at the Curvy Sewing Collective. Also, check out gMarie Sews' tutorial on lowering the neckline if you like to show a little bit more skin. We'll come back to the E.S.P. dress in the future to show some other fun pattern adjustments but we REALLY want to get to our newest pattern the Cats Cradle dress and the fabulously easy trick to sewing its lovely ribbon cage work!
Cheers!
E.S.P. Dress Sleeves: Sleevie Wonder June 22 2016
Okay, starting to get a hang of this writing thing.
Now that the bodice is fitted and the skirt is gathered or pleated to your liking, we can get the sleeves done. The E.S.P. dress has slightly flared raglan sleeves that hit about mid bicep. Tanya, from Curvy Sewing Collective, looks AMAZING in this length of sleeve. We LURV all of the E.S.P. dresses she has made.
You may find that you want a different sleeve for a slightly different look. Here are some options.
Shortened sleeve
Our model found the sleeve length did not work with her proportions (she felt it made her bust seem wider). So, to let the bust "stand out on its own" (her words) we pinned up the sleeve to a length she liked (about two inches shorter).
(Gratuitous photo of adorable corgi a blatant an attempt to increase readership)
We then transferred that adjustment to the pattern so that she will always have a shortened sleeve option.
Elastic band sleeve
If you like the sleeve as it is but want an easy change, try adding elastic to the sleeve hem. We used a 1/4" elastic cut to 1 inch larger than the bicep measurement (14") and used a 1/4" seam allowance (don't sew the ends together yet). If the elastic is too tight, you're feel like you've got a tourniquet on your arm, so test the band to make sure its comfortable.
Iron the sleeve hem up 1/4".

Now, iron the sleeve hem an additional 1/2". Pin and sew the hem close to the folded edge leaving 1" on either side of the side seam.

With your casing all but finished, attach a small safety pin to one end of the elastic and draw it though the casing. Sew the elastic ends together with a big zig-zag stitch. Finally, sew down the 2" of the casing at the side seam.

You now have a slightly gathered sleeve.

(Glamorous movie star scarf and sunglasses enhance the awesomeness of this sleeve option)
Next time: Cap sleeve and sleeveless
E.S.P. Sew Along: OK Pleats For Real This Time June 01 2016
Okeedoke. Onto the topic of skirt fullness and pleating. The E.S.P. pattern has a skirt softly gathered at the waistline a ratio of 2:1 fullness. This means for every one inch of the waist measurement, there are two inches of skirt.

Gathering the skirt at the waistline creates a certain amount of bulk depending on the ratio and the heaviness of your fabric. To achieve the luxurious look of a fuller skirt without added bulk at the waistline, PLEATS! Pleats might have a bad rep for being harder to do than straight gathering. And yes, there are more steps to the process but it is TOTALLY doable even for someone newer to sewing.
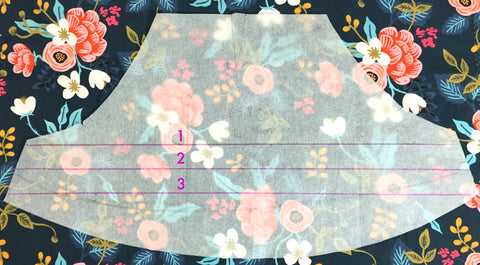
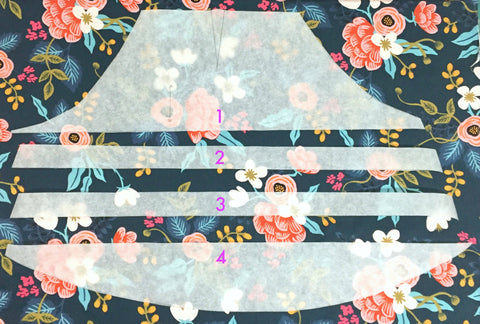
Our preferred fullness ratio for a pleated skirt is a 3:1. To get this number, we measure the waist edge of bodice front after the darts are sewn and minus the seam allowance, and then multiply that number by three. For the Skirt Front on the size 40 we need a piece that is 19" x 3 or 57" wide. For each Skirt Back, we need pieces that are 10" x 3 or 30" wide. For the length, you can work from the pattern piece (it is just at or above the knee so if this is too short for your taste, use the skirt length from a pattern you like.)
We cut our Skirt Front piece at 57"x 25" and our two Skirt Back pieces at 30"x 25" each. Next, we transfer our skirt markings (pocket position on the side seams and zipper position on the center back seam). We will be doing one direction knife pleats, but there are lots of pleating options. The Yellow Spool has a very clear tutorial on three different pleats: knife, inverted box and box.
For this dress, we made fewer pleats that are fairly deep. This is not a surgically precise way of making pleats. But it doesn't matter because no one will be measuring the pleats on your dress when you are finished. The goal is to make them appear uniform. If they are off by 1/8" or 1/4," it won't be noticeable. If free wheelin' gorilla pleating sets off your OCD, then the math version is to divide the waist front measurement by the number of pleats you want (this gives you the depth of each pleat.) Repeat for the back using an even number so you can have the same number of pleats on either side of the center back zipper.
Laying out the skirt front (right side down), we first marked the seam allowances.

Measuring from the seam line, we place a pin at the distance our our chosen pleat depth of 1 1/2" (Pin A), followed by a pin at 3" (Pin B) Repeat this configuration all the way across the Skirt Front piece and the two Skirt Back pieces.
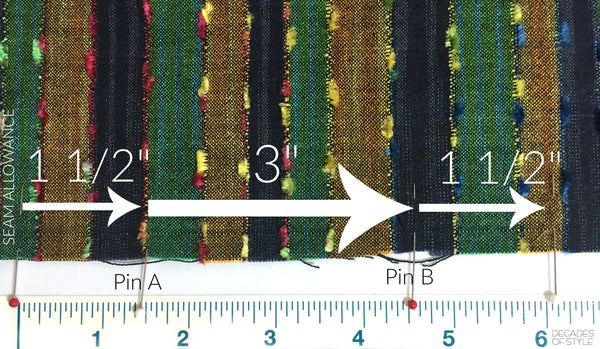
When you bring Pin A to Pin B, you will get a knife pleat that is 1 1/2" deep.

The pleats should abut one another with no spacing between.

There was a bit of unpinning and redistributing to get the fabric worked down to the waist line but any unevenness is not noticeable.

Other gathering and pleating options:

From left to right: 2:1 gathered, 3:1 gathered, 4:1 box pleated (too much fabric to gather), 3:1 pleated changing direction at the Center Front (box pleat) and Center Back (inverted box pleat).
Next up: Sleeves!
E.S.P. Dress Sew Along: A Week Late And Not About Pleats May 17 2016 5 Comments
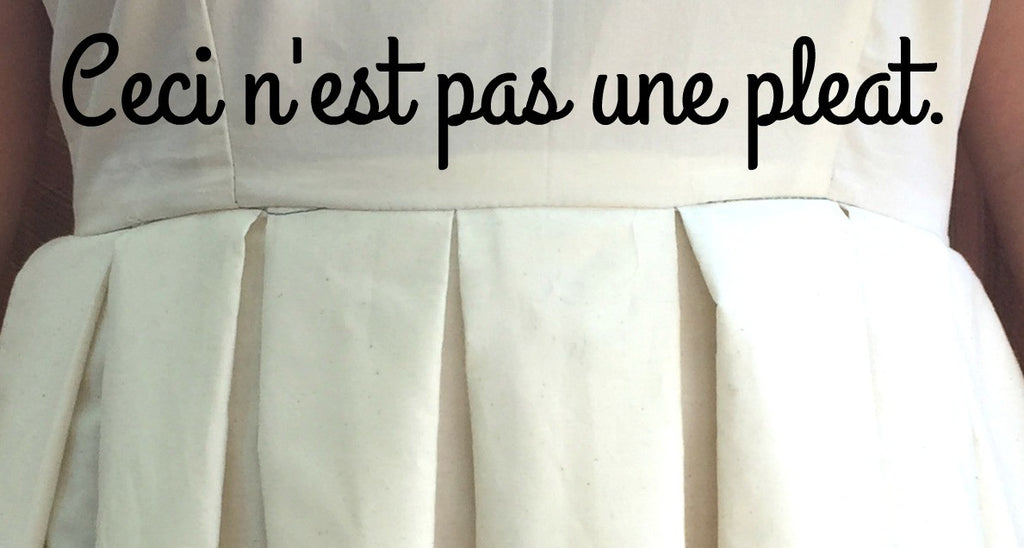
Art history nerd joke mash up of Magritte and pleats for the header image. Apologies to the art sensitive!
Man! This "blog voice" thing is tricky! Last week's post really had an overwhelming "Wah wuh. Wah wah was wuh." feel to it. That's the teacher from Charlie Brown in case you couldn't tell. The teacher from Charlie Brown is not the voice we want so we'll keep working on it.
We said we were going to talk about pleats in this post but we lied. We're going to talk about cutting your pattern on the cross grain instead. Here we go!
Our fabric has stripes running perpendicular to the selvage (aka railroaded stripes). Cutting the pattern on the straight of grain would give us a horizontally striped dress. Our model said, "Um. Nope." to horizontal stripes, so we'll cut on the cross grain.


The biggest difference between the cross grain and the straight of grain is the cross grain has more "give" to it. You can see for yourself by pinching two points on the cross grain and stretching it slightly. Try it again of the straight of the grain and you should see a difference. The cross has more stretch; it should bounce back, as the "give" is due to the tension in the threads when it is woven. Threads has a very informative article on changing your grain direction for different design effects as well as a detailed article on how grain lines "behave".
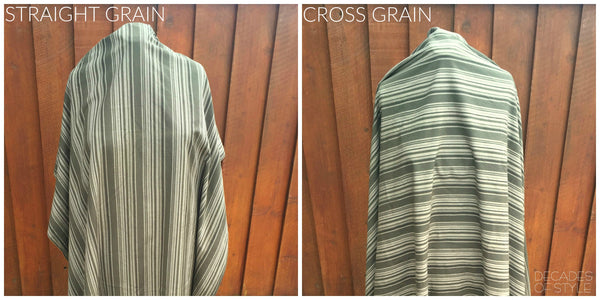
You can see the difference between the two. The drape of the straight of grain is softer and falls closer to the dress from. The fabric draped on the cross grain holds a shape further out from the dress form. Some recommend increasing the circumference of your garment by an inch if you are cutting on the cross grain. It all boils down to personal preference and the specifics of your fabric and pattern. You might notice a garment cut on the cross grain feeling a bit constricting across the back and shoulders.
Our fabric has an unusually stable weave and there is actually not much difference between the cross and straight grain regarding "give" and drape. So for this project, cutting the bodice and skirt on the cross will have little affect to the drape and fit of the dress.

Ok. We're still figuring out how to pace things so we'll end it here this week. Next week, we'll talk about increasing the fullness of the skirt and how we gorilla pleat the skirt.
Cheers!
E.S.P. Dress Sew Along Week 1 May 04 2016 2 Comments
First off - progress report on the search to establish the "voice" for our blog. Er...no actual progress made on that front. We are fast giving up hope of every nailing this down entirely.
So - on to the sew along part! The key to making the E.S.P. dress look beautiful and feel comfortable is a well fitted bodice. A muslin, also known as a mock up or toile, is our preferred way of determining what changes have to be made to the pattern, if any, to ensure a proper fit. Yes, this does delay the gratification of finishing the dress for a while, but it is SO worth it! A properly fitted dress is a revelation. You will feel amazing and proud as you say "This beautiful and comfortable dress? Oh yes, I made it."

BEFORE YOU CUT, CHOOSE YOUR SIZE.
Our model's measurements are Bust 42", Waist 35", Hips 45". At first glance, it appears that the size that best matches those measurements is 42 (our sizes are labeled based on bust measurement). But our model is a DD cup so this changes EVERYTHING! Our patterns are sized and graded based on a B cup, as is the majority of commercial sewing patterns. If your bra cup size is a C cup or larger (regardless of your band size) you will most likely need a Full Bust Adjustment (FBA) to make the bodice fit properly. If you your bra cup size is LARGER than a B – use your high bust measurement to select your size and go from there.
The FBA is positifvely magic as it adds exactly what you need, where you need it to fit your curves. And believe it or not - it is EASY. If you have no pattern adjustment experience, don’t be scared. Check out our favorite FBA tutorial at the Curvy Sewing Collective (whom we love love love, BTW, and you will too when you see all of the amazing information and body positive posts). They make understanding and learning the FBA so easy and clear. Adding the FBA to your sewing skills will be life changing – we kid you not! If you prefer having someone talk you through it, look at Sewing Parts Online's video. It also covers a Small Bust Adjustment (SBA), which helps those with an A cup get rid of a baggy bodice. Need to do a SBA? Use your bust and waist measurement to select your size. There is a written tutorial on the SBA by DixieDIY.com which is very helpful.
As per the FBA guidelines, we selected the pattern size based on the model’s high bust measurement, 40” . Then we did the FBA on the size 40. We placed the sleeve piece over the bodice front to determine the shoulder and mark a point 1/3 of the way down the armscye for the FBA.

Besides adding the fullness to the bodice, now is the time to move the darts to correspond with the bust apex. Again, we'll defer to the Curvy Sewing Collective for a tutorial on lowering a bust dart and Itch to Stitch, which covers moving the waist dart, as well.
Below, we have the results of a WHOLE LOTTA muslin sewing! The first and second row of photos show the muslin sewn directly from the pattern with no alterations. The third row is the muslin with all the pattern adjustments.

See the difference? The size 40 is too tight at the bust (pulling at the bust line in front and back). The size 42 fits the bust but the waist and neckline are too big. The size 40 with the FBA fits the bust "like a glove, but on my boobs," to quote our model.
You may notice there is some extra fabric at the lower back. To fit the lower back, we did a Sway Back adjustment. Tanya at the Curvy Sewing Collective (broken, happy record) has a quick tutorial on this adjustment. Also, the size of the dart can be increased to remove the excess fabric from the bust side. And this is why we love making muslins!
Muslins don't require having all the seams finished and facings sewn on. Just put the essential pieces together and try it on.

If you are new to sewing, this is a great time to practice your marking and dart sewing techniques. Check out these tutorials on marking and sewing a dart by Lucky Lucille and Threads magazine (if you prefer videos).
Next week: The pleated skirt variation.