News
Slouchy Witch Hat Pattern Hack for Hilde Hat September 24 2023
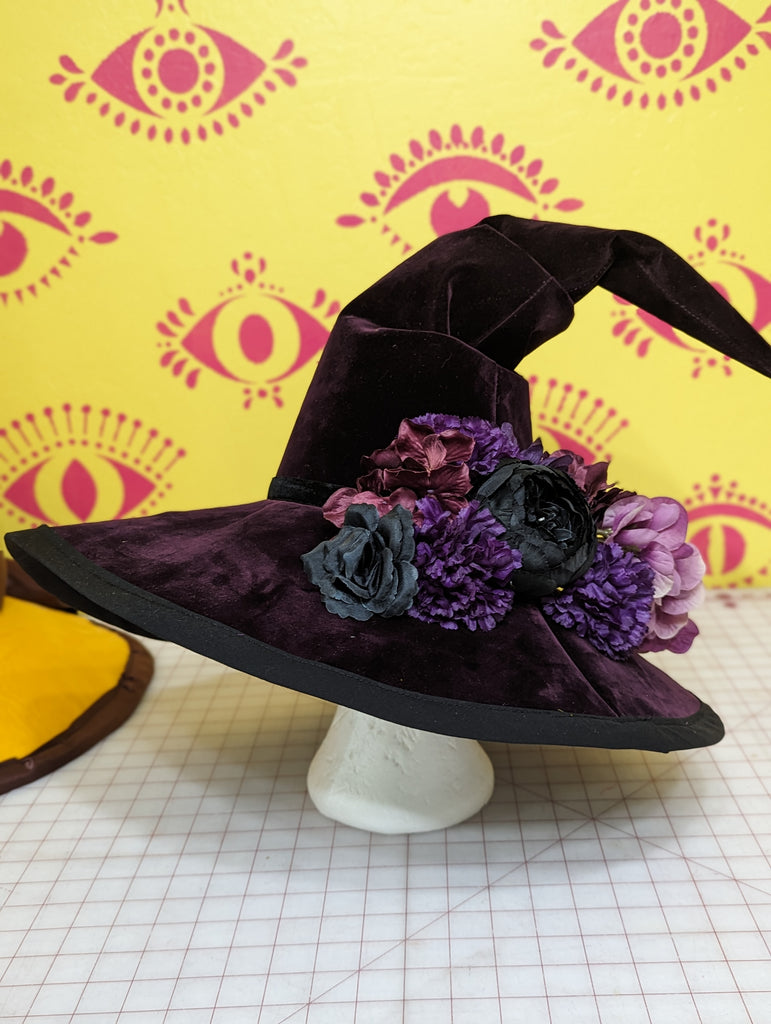
We are SO thrilled to have guest blogger Tamsin Eilers of @greenstitchwitch Instagram account giving us her Slouchy Witch Hat Pattern Hack for our Hilde Hat pattern .So without further ado, here's Tamsin!
I am a Halloween superfan! There's nothing better than hot apple cider, costumes and scary decorations! From the first moment I laid eyes on the Hilde Hat pattern, I just knew I was going to hack it into a witch hat. I have been on the hunt for *the* perfect witch hat pattern for over a decade! My hunt is over, and this is the only witch that I will ever need. This is a super fast and easy sew, thanks to the pattern!
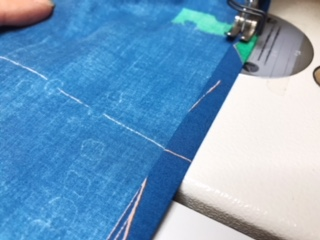
To get started, you'll need some supplies:-The Hilde Hat pattern-1 yard of fabric (i used flocked denim, and it was the perfect weight)-1 yard of lining fabric-two yards fairly stiff interfacing (you need your hat to stand on its own) I used Pellon #809-chalk or fabric marker-long ruler or yardstick-bias binding (at least 2 yards)-measuring tape-decorations for your finished hat! Fabric or dried flowers, plastic fruits and vegetables, ribbons and lace,the sky's the limit!Start by taking your head measurement and choosing the correct size of the Hilde Hat. We'll only be needing the crown(B) and brim(C) pieces.set your crown piece on the fold of your fabric and use your ruler to draw a line from the base to the fold, creating a long triangle. You can do this on paper to create a pattern you can reuse or draw your chalk line directly on the fabric like i did.


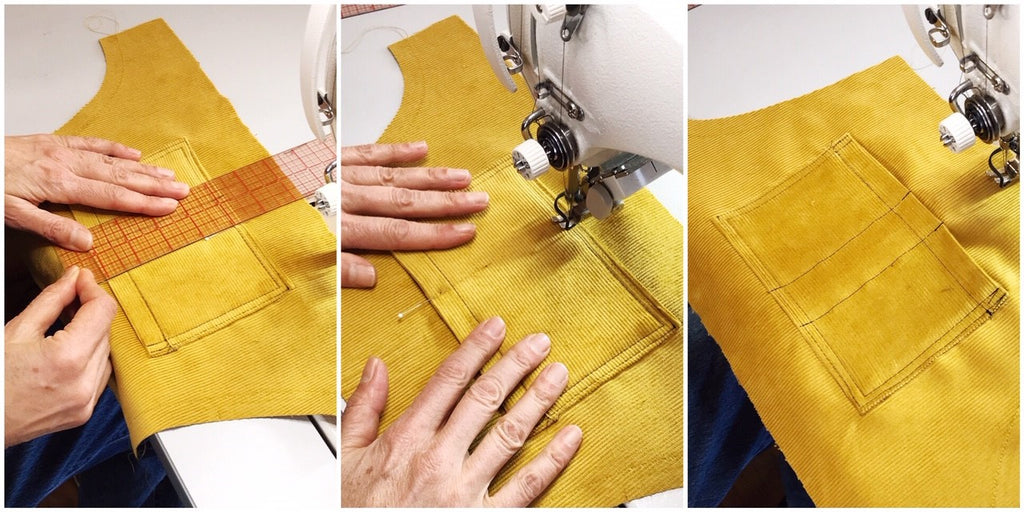
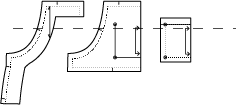
For the brim, we'll be tracing the outside edge to be 2" bigger. Use your ruler to create a dotted line 2" larger than the pattern piece. The inside circle will remain the same.
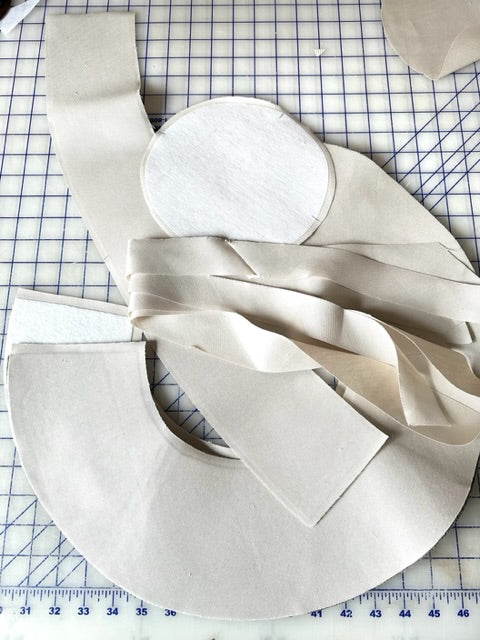
Cut out your fabric and lining, one crown and one brim each. (Lining not shown.)

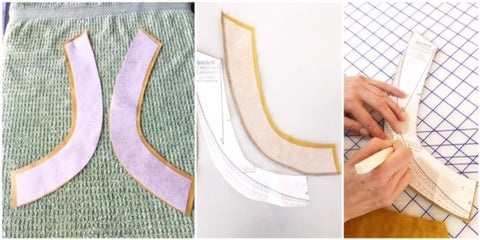
Then cut your interfacing. For the interfacing you'll need two crowns and two brims. All four pattern pieces will be interfaced for maximum stiffness.

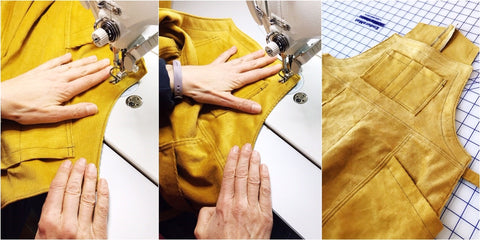
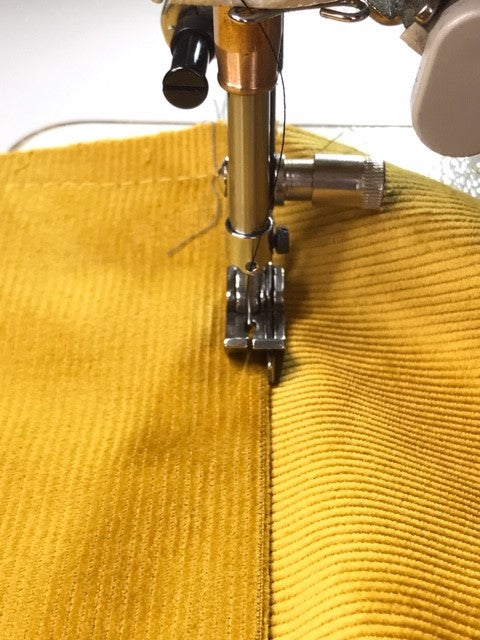
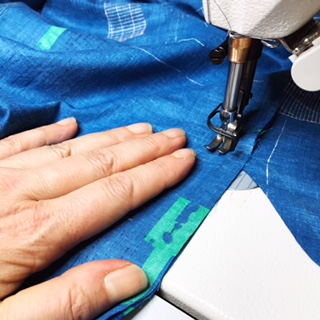
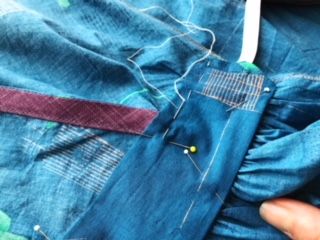
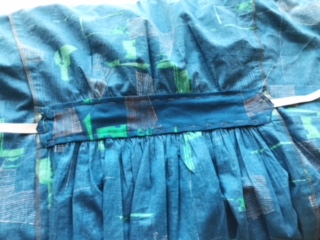
Next, sew up the cone pieces along the long side, both the main fabric and lining. Attach the cone to the brim (use the instructions included with the pattern), right sides together for both main fabric and lining.turn the lining inside out and insert it into the main fabric piece


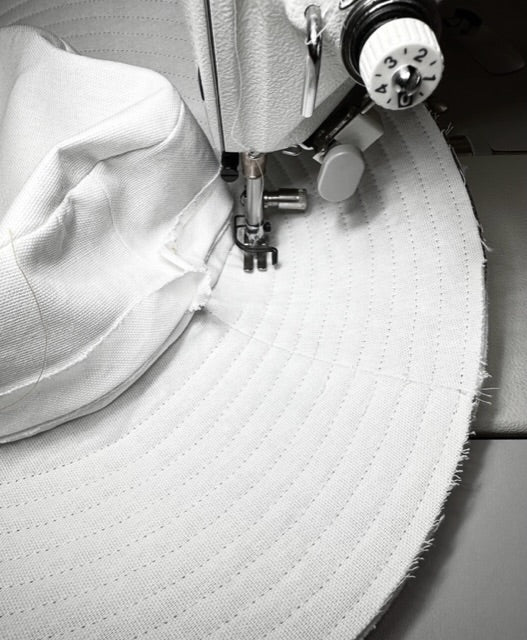
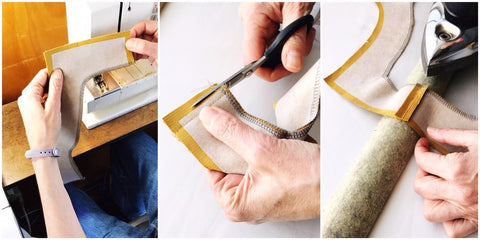
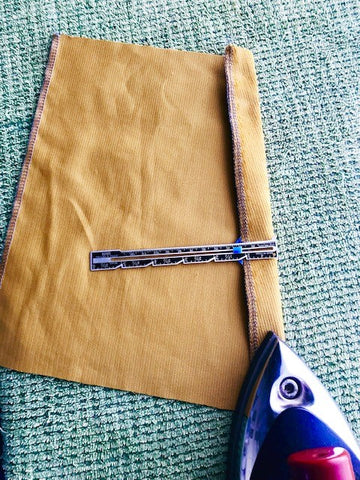
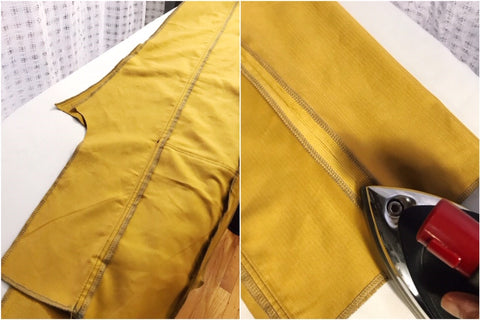
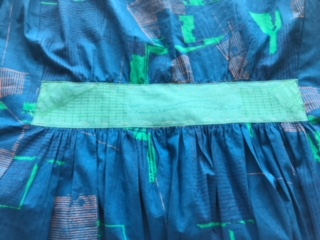
Sew the two brims together and attach bias binding following the instructions included in with the pattern.
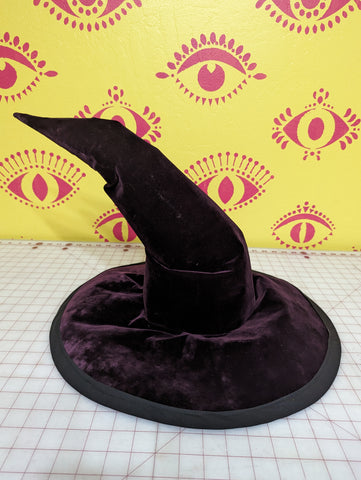
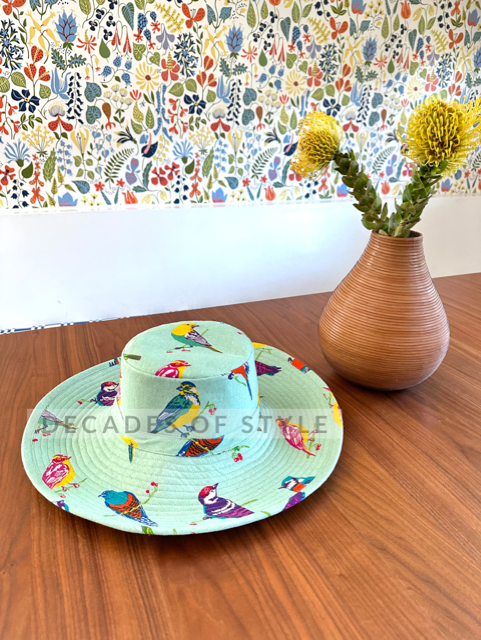
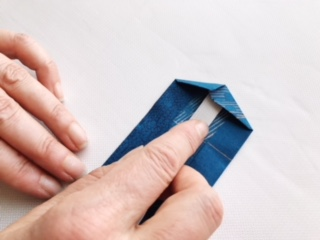
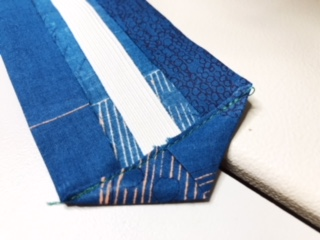
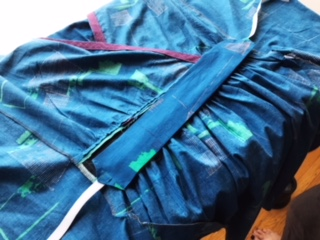
This is the fun part! you can scrunch it up in any way you like! The scrunches will stay in place for the most part, but if your interfacing is very stiff, you may want to tack your folds down with a hand stitch. Decorate to your liking and you're finished!

Hilde Hat Sew Along Part 4 - Finishing July 14 2023
Hilde Hat Sew Along Part 3 - Bind that Brim July 14 2023
Hilde Hat Sew Along Part 2 - Lining and Brim Stitching July 14 2023
Hilde Hat Sew Along Official Part 1 - Let’s sew! July 14 2023
Hilde Hat Sew Along Introduction July 14 2023
Welcome to the Hilde Hat sew along! We are so happy you are joining us!If you’ve never made a hat before, don’t be anxious because it’s just sewing. No wires involved, perhaps there is a Pellon product you have never used before but we all know how to fuse interfacing to our pieces so it’s going to be fine.This installment is just going to be a quick introduction covering suggested fabrics and the aforementioned Pellon products. The suggested fabric list is pretty short, “light to mid weight to canvas. Avoid heavy or bulky fabrics.“ Other mid weight fabrics (bottom weight) with a stable weave will work. The seam allowances in the pattern are 3/8” so if your fabric frays very easily (like linen), the project will be challenging.
If you’re wondering if apparel fabric that is more dress weight or shirting weight, like regular quilting cotton or oxford cloth will be suitable, the answer is not really. It's a bit like looking for the Goldilocks weight of fabric; not to light, not too heavy, but just right.
Quilt cotton or other lightweight fabrics are suitable for the lining.
No matter how tempting it is to use a heavy weight fabric or heavy weight canvas, try to resist because it will be more difficult to sew. Also, the fit will not be as expected due to the extra bulk of the heavy fabric in the seam allowance. We know this firsthand from our many rounds of testing on this pattern!Japanese linen canvas fabrics are the perfect weight for this project - tested and confirmed! And you’re not going do better in terms of whimsical prints if you go this route - see three photos below! You can find Japanese fabrics at independent fabric stores like Stonemoutain and Daughter Fabrics, Harts Fabrics and Bolt Fabric Boutique;


The cotton canvas at Joann Fabrics - 44” wide and $12.99/yard regular price - is another option with large selection of prints available. This fabric is technically in their decorator section but it is just right! Shop Joann's Cavas selection. The solid cotton duck in the Joann decorator department is also an option. This fabric comes with a very heavy duty coating of sizing. If you are not pre-washing the cotton duck, you probably won’t need the layer of interfacing in the brim.
Fabric brands like Ruby Star and Cotton and Steel usually have a light weight canvas included in their quilting cotton collections so there are many options.
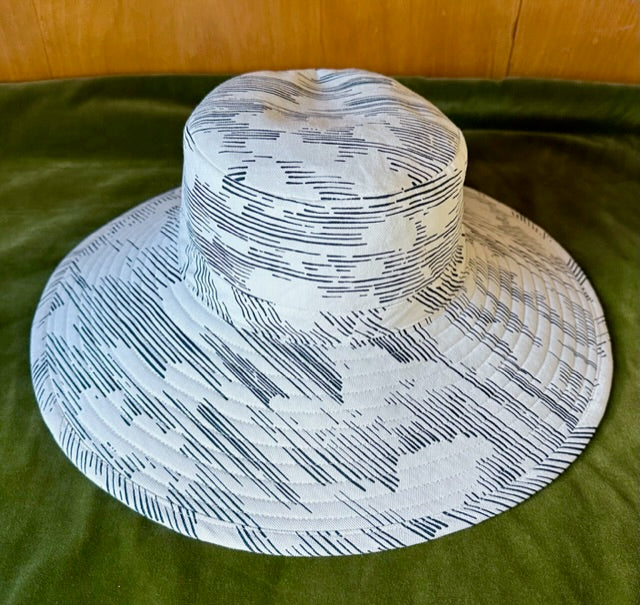
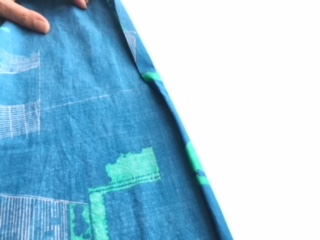
You can successfully use a large scale print for the project but it’s probably best to stick to an abstract design. (Also, it helps to buy extra yardage of a large scale print so you have more leeway in how you cut your fabric.) The photo below show 1 yard of a large scale print canvas. The repeat on this fabric is almost overwhelming! But keep reading and see how it works beautifully for the pieces of the hat.

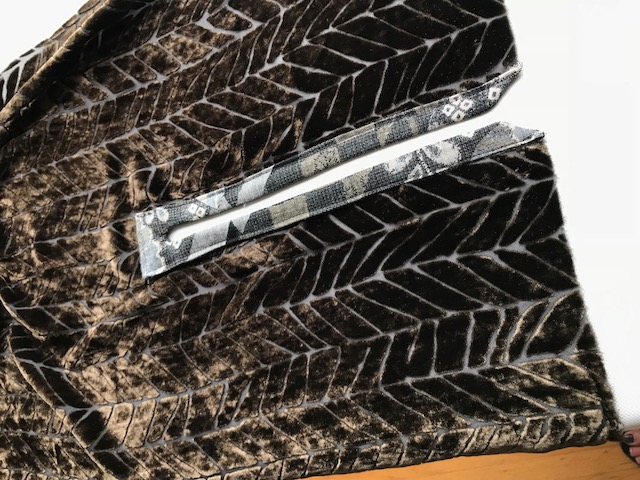
One helpful way to envision how a print will ultimately work in your project is to use the paper scraps from the pattern to make a template. The template simply creates a “frame” of exactly what part of the print will show.

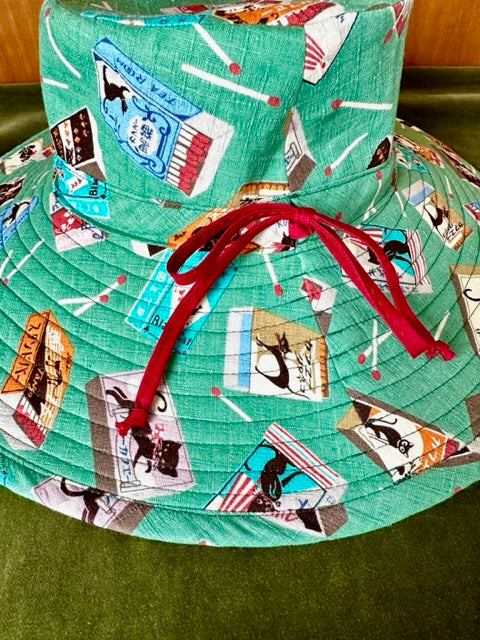
Below are 3 different choices of fussy cutting that fabric to show the crown of the hat.

As you can see, it can be surprising and delightful the way a large scale print parses in the hat pieces.


If you have recognizable elements in a large scale print, such as flowers, leaves or animals, you will most likely only see parts of any one element on the hat pieces. So depending on the scale, not a whole flower, only a cropped part of it. Use your template to help you fussy cut to maximize the effect of the fabric. 

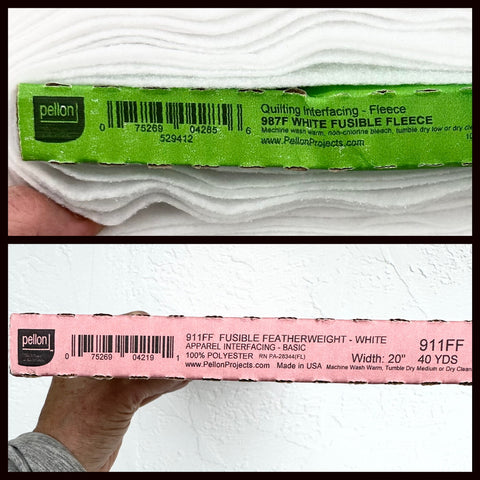
The pattern specifies exactly what Pellon products to use. If you want to use other products, go ahead if you want. Just know ahead of time that WE DON’T KNOW if your substitutions will work. We just don’t. If you email us to ask if "X or Y" will work instead of the fusible fleece, the answer is WE DON'T KNOW. There are times to "shop your stash;" we don't think this is one of them. If you shop the sales and/or use coupons, the fusible fleece and interfacing is not difficult to find and not that expensive. You will end up saving in the long run if you use what the pattern says. Photo shows the exact products specified in the pattern.
Find yourself some fabric, get your Pellon products and we'll start sewing in the next installment.
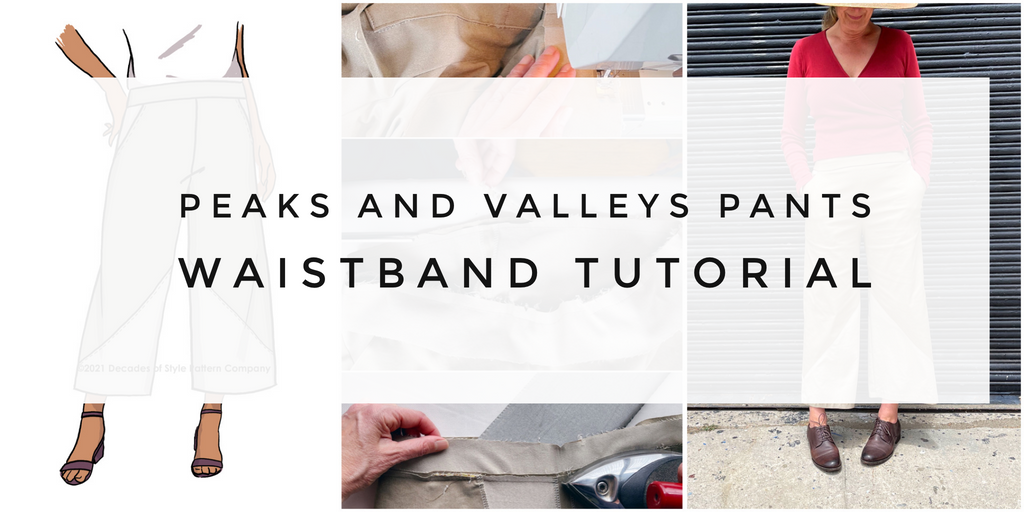
Peaks and Valleys Pants Waistband Tutorial July 27 2021 1 Comment
Ophelia Overalls Sew Along Part 4: Straps and Snaps February 16 2019
Click here for previous installment in the sew along.
All that is left is the Straps and a number of finishing items - so let's get 'er done!
If you have used a loose weave or light weight fabric for your overalls, you will want to flat line the straps with a stable weave fabric like muslin or quilting cotton. Just cut Straps pieces from the muslin or quilting cotton. Stack the muslin Straps on the fashion fabric Straps, wrong sides together and baste them together around the outer edges. Procede with the construction treating the stacked pieces of fabric as one layer.
Narrow hem the unnotched edges of the Straps. Turn in a scant 1/4” and press, then turn in 3/8” and press. Edge stitch close to the fold.

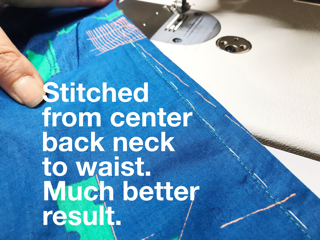
Next, you’ll attach the Strap to the top of the Center Back Pants. The Straps should meet precisely at the center back at the square on the pattern pieces (upper left). Stitch with the pieces right sides together, matching notches (upper right). Serge or zigzag the seam together and press seam down (lower row).

Edge stitch and topstitch on the Center Back Pants, catching the seam allowance in place on the inside of the overalls.

Time to attach the front Belt.
With the remaining belt pieces, thread your buckle or D rings through about half way (upper left). Work with the side vent pinned shut (upper right). Place the finished end of the Belt at the placement line and pin temporarily (lower row).
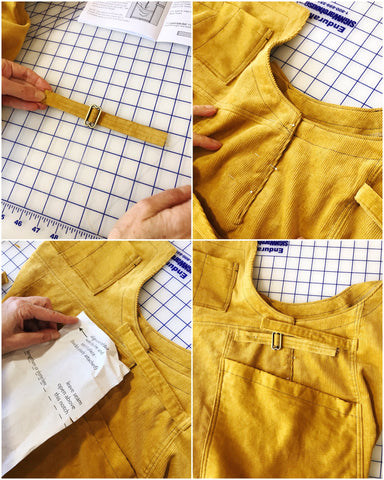
Thread the back Belt through the buckle and positioned the buckle so that the back Belt just reaches through the buckle (upper left). Mark the location of the buckle on the front Belt (upper right, lower left). Unthread the back Belt and unpin the front Belt from the overalls (lower right).

Cut off the front Belt about 1” past the mark for the buckle (top). Finish the cut end (middle). Fold that end to the underside of the Belt and hand stitch in place keeping the buckle at the designated location (bottom).

Underside of Belt and top side of Belt (upper left). Pin the front Belt on the Side Front Pants aligning the free end with the Belt placement line (upper right). Stitch in place (lower left). Voila (lower right).

OK - Now for all the finishing stuff. We have some tips to speed it along.
Try the overalls on and pin the Bib to the Strap so that the waistline of the overalls is right at your natural waist. We are working on a dress form, so this photo shows her waist (top row). On the Strap, mark the top of the overalls (bottom row). Now you can take the overalls off.

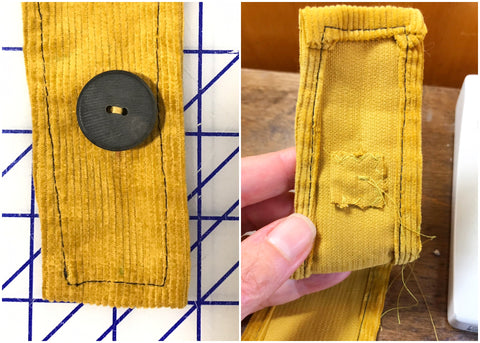
Fold the Strap in half lengthwise and mark that center line along the fold. Mark the center of the button location on the center line. For a 1" button, mark the 1" below the line indicating the top of the Bib.

Take a small scrap of fabric aproximately 3/4" by 1 1/2" and fold in half, right sides together. Zigzag around the perimeter (top row). Baste this square on the wrong side of the strap centering it at the button mark (bottom row).

Sew the button on the right side of the Strap through all layers of the patch on the wrong side. (If you have anything other than a 1 inch button, you will need to adjust the button location on the Strap. A larger button will be a bit further down the Strap.)
Make a vertical button holes in the upper corners of the Bib. The distance from the side of the Bib is half the width of the Strap at the location of the button (left). The top of the buttonhole should be 7/8” the top of the Bib and 1 1/8” long for a 1” button (center).

Make a horizontal button hole on the Bib at the waist line. Start buttonhole 7/8” from the edge of the Bib and center it in the area above the waist as best as possible. Sew on button for waist.

With the Button Placket pinned as shown (upper left), mark snap locations spacing 3 snaps in the area under the button (upper right). We sewed the buttons and on with the machine using the darning foot, stitch width of 4 and a stitch length of 0. Using the same stitch settings, we attached the male half of the snaps to the Button Placket knotting the loose threads securely afterwards (bottom row).

Sewing the female snap goes pretty quickly if you double thread your needle. Take a fairly long length of thread and fold it in half. Thread your needle with two strands of the thread (top row). You now have four strands of thread going through your needle and will only need to stitch twice through each attachment point on the snaps (bottom row)
 .
.
A 5/8” narrow hem is allowed on the pant legs. Turn up 5/8", turn the raw edge into the fold and press. Machine stitch hem.

Now you have the cutest pair of overalls on the planet!

Thank you so much for sewing along with us!
Ophelia Overalls Sew Along Part 3: Bibbity Bobbity February 16 2019
Click here for previous installment in the sew along.
Let’s jump right in and get the bib on these babies!
Make the Bib Pocket by turning back the top edge along the foldline (A) and stitching up the sides(B). Turn it right side out and then press in the seam allowance on all the remaining sides (D_E). Stitch top edge in place (F).

Finished Bib Pocket:

Before you start working on the Bib and manipulating it, stay stitch the curved edges right along the seam line So they won’t get stressed or distorted while you’re working. (The stay stitching is hard to see because the thread color matches the fabric.)

Mark the Bib Pocket placement lines on the Bib. We used an awl punch hole just inside of the placement lines so the Pocket covers the marks (a-c). Place the pocket on the bib and glue-baste or hand baste the pocket in place (d). We glue basted the Pocket and it did shift a tiny bit while we were stitching (hand basting it is always the best). Edge stitch and topstitch the pocket in place (e-f).

If you want, use stitching lines to divide the pocket into sections. A clear 2 inch ruler can be used to mark your stitching lines.

Next ,pin the Bib to the front edge of the waist, right sides together, matching center fronts and matching the notches to the princess seams (1). Stitch seam (2). Trim the seam allowance on the Bib only and press the seam towards the Bib (3-5). And edge stitch and topstitch the seam on the Bib (6).

Now we’re going to use the facing to finish all the edges of the Bib and the front opening on the overalls. First, interface the Bib Facing pieces, trimming 3/8" off the notched edges and fusing to the corresponding bib facing pieces. Finish the inner and lower edges (right). We rounded the inner curves on the Bib Facing piece to make it easier to put through the serger.

Stitch the Bib Facing right sides together at the center front. Trim the seam, press open.
Pin Bib Facing to Bib, right sides together. Stitch Facing to the Bib, starting from lower notch on the Facing to lower notch on the other side.


Clip corners (left). Grade the seam allowances so that they are graduated in height and the shortest layer is closest to the body (center). Clip seam allowances along the curve (right).

If you have a point presser, this is a good tool to use it to press the seam open before turning the Facing right side out. This makes the edge along the seam much easier to control once you’ve turned the Facing right side out.


Edge stitch the seam from lower notch to lower notch.

Top stitch the Bib approximately 1" from the edge as shown, starting at the waist and stitching to the waist at the other side.
Now we can attach the Back Button Plackets. With the right sides together, stitch the top edge. Then turn them right side out. If your fabric is not too bulky, you don’t need to clip the corner (left). Just fold the corner down and hold it in place pinched between your thumb and your forefinger as you turn(center).

Press and serge the bottom edge. You can serge the sides at this time like we did or you can also wait until you attach the Placket and serge the sides along with the Pants.

If you haven't done so yet, mark the notches on the Placket (left). Center photo shows the notch at the side opening. Match the lower notch on the Placket with that notch at the bottom of the side opening (right).

Match upper edge of Placket with circle at waist (left - the circle is marked with a tiny awl punch that doesn't show in the photo. Just note that top edge of the Placket is offset from the corner by 5/8"). Placket pinned in place at side opening (center). Stitch between the lower notches and the circle at the waist edge. Press all the seams towards the back (right).

Stay stitch the curved back edge right along the seam line. The stay stitching is in matching thread so it is not easy to see but it is there.

Prep the Back Facing pieces exactly as you did the front, trimming the interfacing and fusing it to the corresponding pieces (left). Finish the inner edge (center). Mark where the back princess seam will match the facing (right).
Pin Back Facing to the overalls right sides together matching the reference marks and notches (upper left). Stitch from circle at waist edge of facing - the location of the circle is the pin (upper right). Grade the seam allowance in the same manner as the Bib Facing (lower left). Clip the curve (lower right).

Press the seam open (upper left). Turn under the seam allowance at the short end that abuts the Button Placket (upper right). Turn the Back Facing to the inside and press (bottom row).

The Back Facing will look like this after pressing:

Edge stitch the facing (left). Topstitch 1" from edge securing the Facing in place on the inside (center). The back edge is finished now and will look like the photo at the far right.

Let's finish this installment up with anchoring the Button Placket and Bib Facing to the overalls.
Lap the front edge of the waist opening over the Button Placket and pin the opening shut as shown (upper left). Pin the bottom of the Bib Facing and the Button Placket in place . It makes it easier to deal with if you hand baste everything at this point (upper right). Mache Stitch through all layers at the level of the lower notch anchoring the Button Placket and the Bib Facing to the side front trousers (bottom row).

You made it through another long installment!! All that is left now is the Straps and the finishing steps. Join us next time!
Click here for the next installment in the sew along.
Ophelia Overalls Sew Along Part 2: Set Up and Sew February 13 2019 2 Comments
Click here for previous installment in the sew along.
In spite of the multiple (and maybe a little finicky) elements of design in this pattern, it is a fun sew! If you have a serger, you can speed up the sewing time by pre-finishing the edges. Here's a quick guide regarding the edges to serge and which you can leave raw. Serged edges are highlighted in red. Serge at the raw edge leaving your 5/8” seam allowance in tact.

The remaining non-serged edges will either be enclosed in a facing or will be finished with along with additional edges as the construction progresses.
If you don’t have a serger and are zigzagging or using some other method to finish your seams, it’s no problem! Just use your desired finishing method as you progress.
For any of you who might happen to have an extra (possibly vintage) sewing machine lying around (or maybe even a collection of them), this is the perfect time to set it up with contrasting top stitching thread if you are going with that option. Gratuitous vintage sewing machine photo below:

Let’s sew!
Stitch Side Front and Side Back Pants together at the side seam leaving the seam open above the notch indicated. Press that seam open. (Just a note ahead of time that there are limited "at the sewing machine" photos. And please forgive the color variations in the photos. The lighting as well as the fabric made consistency a challenge.) This photo is pressing open the seam after stitching.

Stabilizing the top edge of the Pants Pocket will prevent it from stretching out as you wear the overalls. This is particularly important if you’ve chosen to cut this pocket on the straight of grain as opposed to the cross grain. A quick strip of fusible interfacing along the fold line will do the job. Pressing on a towel to try to preserve the pile on the corduroy (right side images).

Turn down along the fold line at the top.
Turn up the seam allowance on the bottom edge and press.

Stitch 7/8” from top fold.

With all the pieces facing right sides up, align the bottom edge of the pocket on the Placement line. Baste the sides of the pocket in place.

Edge stitch and top stitch along the bottom edge of the Pocket. You will be stitching on the cross grain on the pants and on the straight of grain on the pocket. These two different grain lines often have different amounts of “give” to them so hand basting or aggressive pinning is recommended.

If you have a little shift of the pocket and the raw edges no longer align at the sides, don’t worry about it as long as the Pocket still falls in the 5/8” seam allowance, you’ll be good. You can see at the lower left hand corner of the pocket, it shifted and there is about a 1/4" gap to the side. It worked out fine in the end.

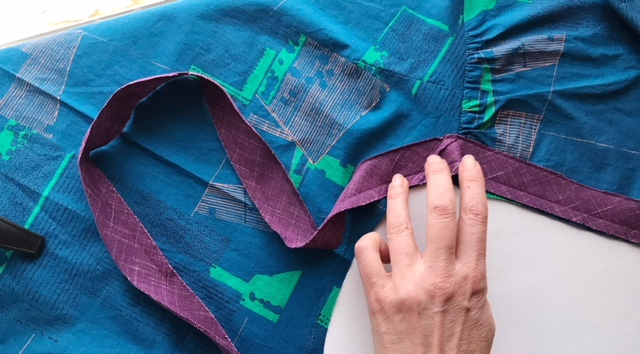
Now it's time to make the Side Belt pieces. You should have enough extra fabric to make a test piece if you have any doubt whether your fabric is light weight or not. We used the light weight fabric construction for the back belt but ultimately we should have gone with the heavy weight construction. So-it’s worth a test!
Here's a tip for the light weight fabric construction. After you trim 1/4" off the edges and press in 3/8" along each side (top row photos), you can stitch the short ends together, clip the corners and turn it to finish that short edge (bottom row.)

Otherwise, if you are using heavier fabric, turn in 1/4", then 3/8" and stitch the folded edges down the middle of the belt piece.

Place one of the belt pieces in the position indicated below the waist notch (left) and baste it in place (right.)

Stitch the Center Front Pants to your side assembly right sides together. Pieces next to each other (left). Seam stitched (center). Trim seam allowance Side Front trousers (right).

Press the seam allowances all towards the side assembly (left). Edge stitch and top stitch on Side Front to create the faux flat felled seam (center). What it will look like (right).

Repeat step with the Center Back Pants. Pieces next to each other (left). Seam stitched (center). Seam allowance pressed towards the side assembly (right).

Edge stitch and top stitch Side Back Pants (left). Finished seam (right).

Stitch the inseam right sides together and press seam open.
Turn one pant leg right side out as shown. Then slip it inside the remaining pant leg that is still inside out. Your crotch seam should align perfectly with the right sides of the fabric together.

Clearly mark corner of the seams at the center back - it is the SQUARE on the pattern piece (upper left). Stitch the seam ending at that Square on the center Back Pants pieces (upper right). Clip seam allowance on where the crotch curve breaks in the front and back (lower left). Finish seam between clips (lower right). If you are not using a serger, trim the seam between the clips to 3/8" and finish as desired.

Press the seams open above the clips.

Phew! Are you still reading? Congrats! Your trousers are assembled. Next time we will assemble the Bib and attach it. See you then!
Ophelia Overalls Sew Along Part 1: Fabric and Fit February 13 2019 1 Comment

Hi all! Welcome to the Ophelia Overalls Sew Along! This is just going to be an introductory post covering fabric choice and the fit of the pattern so we can hit the ground running next time in the construction.
The main thing to keep in mind when selecting your fabric for this project is to avoid anything too heavy or too bulky! Look for a bottom weight fabric that is either mid to light weight and has a stable weave.
It all sounds a little bit wordy but that’s what works best with this pattern. You need something substantial enough to be considered a bottom weight fabric (something that can handle that abuse sustained by pants) but it can’t be super heavy. No heavy weight or super bulky denim or canvas. The construction uses a faux flat felled seam so there are places where you are stitching through quite a few layers. If your machine has the clearance and the pressure to handle 4-6 layers of heavy bulky fabric, then no problem; but many domestic machines will struggle with that load. So keep this in mind.

The suggested fabrics are: Stable bottom-weight woven fabrics are suitable. Avoid very heavy weight fabrics. Light weight denim, twill, light weight canvas, poplin, gabardine, corduroy.
If you are going to choose corduroy, a smaller wale is best. And it might be a good idea to get a bit extra in case you want to play with how you cut that trouser pocket. We used a 14 wale for this sew along and it was lovely! (14 cords per inch).

If you want to go with a lighter weight, looser weave fabric like a chambray or linen, it will work fine but you will most likely need to support the straps by using a double layer of fabric or flat lining the strap pieces with something stable like muslin or quilting cotton.
And speaking of the trouser pocket, it is cut on the cross grain in the pattern. It is a big, awkward pattern piece so if you desire the pocket on the straight of grain, purchase extra fabric (1/4 yard extra should do it). A striped fabric is a very fun choice because of the princess seams and the possibility to play with the grain line! We rotated the grainline on so many pieces in this sample, we can't really keep track of it all.But just look at the result! Purchase extra fabric if you want to play around with rotating the pieces.

Let’s talk about the fit now. These overalls have a very relaxed fit! There’s 5" of ease in the hip. That’s a lot of ease but not overwhelming.

That much ease preserves a vintage look from both the early century (as shown in this WW1 era photo of ladies delivering ice) and later into the 30s and 40s.


If your body measurements fall between sizes, using the smaller size will be fine. A number of our pattern testers decided to go down a size from what their body measurements corresponded to. This will result in a closer, more modern fit. You’ll end up with 3" of ease in the hip which is standard. Kathe's overalls are fitted with very little ease and they look great!

Just a reminder that this pattern has been drafted for a B cup. If you need to make adjustments because your cup size is much larger, your options are lengthening the straps and/or making the bib taller and wider as you desire. On this particular pattern, it’s not very scientific - it just means a bit of trial and error work with scrap fabric.
Whatever adjustments you make to your Bib, make the same adjustment to the Bib Pocket and Bib Facing! It is a smallish space and the Pocket to Bib proportion gets thrown off very quickly!
Lengthen or shorten on dotted line for Bib, Bib Facing and Bib Pocket.
The best way to make your decision which size you prefer is to make a muslin! We really recommend making a muslin! Making a muslin is the best way to address fitting issues and achieve a finish garment that is successful! In summation, we really recommend making a muslin! Seriously though! We can’t emphasize enough how making a test version will save you time and money in the end and help you achieve the best results possible.
Click here to purchase the pattern.
Okey-doke! See you next time where are the sewing will commence!
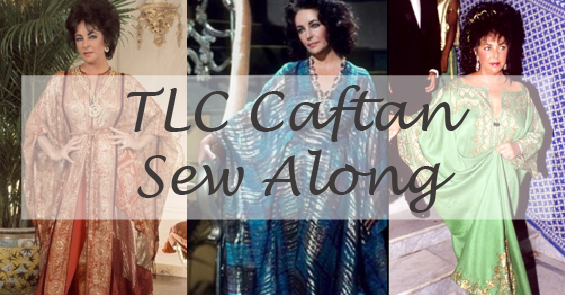
TLC Sew Along Part 4 - Machine Stitching the Home Stretch May 09 2018
Click here to read previous installment.
We're on the home stretch now! In spite of the somewhat time consuming detail of the reverse facing, this Caftan can zoom along quite quickly after that because the rest of the contstruction is done by machine (with a wee bit of hand basting to facilitate one step.)
Next in the construction is to attach the Side Panel to the bodice/skirt assembly. Start by turning the Side Panel right side out. Your bodice/skirt assembly should be inside out. Slip the Side Panel inside the bodice/skirt assembly and match up the shoulder seams and reference marks. (If this caftan looks off to you in terms of length, remember we shortened View B by about 12 inches to make a tunic length version.)

The Waist Insets go in between the notches marked on the pattern piece.

Stitch the Side Panel to the bodice/skirt assembly. There might be a bit of easing to be done along the bodice part of the seam.

Pivot at the small circles and stitch around the perimeter of the pocket.


Clip the seam allowance above and below the Pocket and press the Pocket towards the center front. Press the rest of the seam towards the Side Panel. (somehow, we did not end up with photos of this part! Sorry!)
On to the Waist Inset Facings. We'll show you our work attaching elastic to one end of an Inset Facing piece. You'll need to do these steps to finish both the Front and Back Waist Facings.
Turn in the 5/8" seam allowance all around the Waist Facing (the end of the seam gauge is 5/8" and makes for a quick check for accuracy).


Now turn under the tips of the seam allowance across the short ends to create a straight edge as shown.

Cut your length of elastic into 4 equal pieces and slide the end of one piece under that straight edge.

Edge stitch the straight edge through all layers securing the elastic in place.

Flip the elastic towards the point at shown.

Stitch from the right side securing the elastic to the point. Pretty much any configuration of stitching will do. The goal is to have that tip of the Waist Facing stitched to the elastic.

Once you have attached the elastic to each end of the Waist Facings, turn the caftan inside out and place the Facing over the corresponding Waist Inset. We are working with the Waist Facing Front in these photos.
Pin the Waist facing in place matching the center fronts. The folded edges of the Waist Facings should just cover the seams from the Waist insets.

Even though hand basting seams like a pain, it is the best way to do this step. It is worth the small bit of time to hand baste the Waist facing in place.
Sorry for the change up but the photos now switch to the Waist Inset BACK. Here is the Waist Facing basted in place.
Working from the right side of the garment, edge stitch the Waist Facing through all layers. Take care to keep the elastic (or twill tape) free from the stitching.

It will look like this from the right side:
On the inside, the edges of the Waist Facing should be secured and it will look like this:

You can remove the basting stitches now.
All that is left is to make a quick machine hem and secure the elastic at the sides. Feel free to hem the caftan by hand if you prefer. The instructions call for a 5/8" hem but this is only a suggestion. You can put in a deeper hem if that is what you want.
Turn up 5/8" and turn the raw edge down into the crease.
Stitch close to the fold.

Try on the caftan and pin or tie the elastic at the inside the caftan to your preferred snugness at the waist. Mark the elastic.

Overlap the elastic, aligning the marks and stitch together.


You're done! Enjoy!

TLC Sew Along Part 3 - About Face! (ings) May 08 2018
TLC Sew Along Part 2 - Skirting the Issue May 07 2018
TLC Sew Along Part 1 - Bodice Construction May 04 2018 1 Comment
CLICK HERE TO READ PREVIOUS INSTALLMENT - Sew Along Introduction
The Bodice of the TLC Caftan is one of the things that makes the caftan unique and flattering. The bodice is more or less fitted to the body. The Waist Insets are held close to the body by either elastic or twill tape ties, effectively holding the bodice in place and making the bodice conform to the body. NO TENT!
So let's jump right in!
Please pay attention to the note at the very beginning of the Construction details in the instructions. The note addresses how important it is to test your fabric to determine how stable the weave is on the straight of grain. The neckline is a surplice (sort of a wrap style construction). If your fabric has any "give" when you tug on it on the straight of grain, your neckline will most likely stretch out during construction and it will gap when you wear it.

If your fabric stretches when you tug on the straight of grain, you will want to stabilize the neck edge of the Bodice Front. Cut a narrow strip of interfacing, 3/8" wide will do, and fuse it along the seam line on the wrong side of the fabric.

Now to the sewing machine! The first steps are simple and familiar. Stay stitch the neck edges and make gathering stitches at the waist and shoulder of the Front Bodice pieces. Start your gathering stitches 5/8" from the edge as shown. This just keeps the gathering clear of that seam.
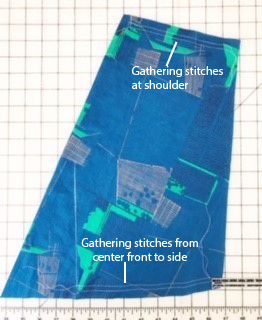

NOTE: If you made an FBA on your Bodice Front (see previous installment Sew Along Intro) - you would stitch the newly created side dart here and press it towards the waist.
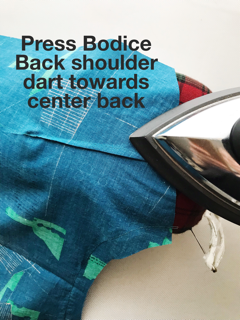
Next, the Back Bodice gets gathering stitches at the waist and darts at the shoulders (pressed towards the center back.) Start the gathering stitches 5/8" from the edge just like on the Bodice Front pieces.

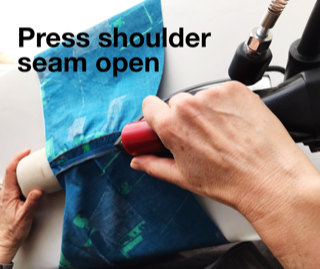
The shoulder seams are next:


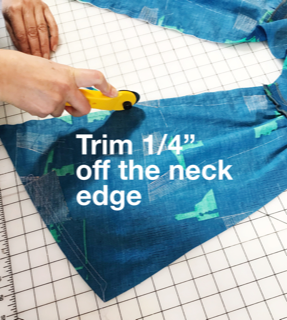
Now the neck edge gets finished with bias binding.
First trim 1/4" from the entire neck edge. This leaves you with a 3/8" seam allowance. The smaller seam allowance makes it easier to shape the bias to the curves.
The pattern instructions call for you to cut a bias strip from your left over fabric. We're using a contrasting fabric that shows better in the photos: a contrasting bias finish is pretty detail to add to your garment.
Start at the waist edge of the Bodice Front and pre-shape your bias strip by aligning the raw edges and pressing the bias tape as you go.

Shaping the bias strip neck curve is the most important part of this step and will help you have a nice smooth result. It helps to "ease" the bias tape at the sharpest part of the curve. The goal is to keep the outer edge of the bias strip nice and flat. You can kind of gather the bias tape along the inner or neck edge here as shown. Just enough to be able to keep the other edge of the bias strip flat as you go around the curve.


After you've pre-shaped the bias strip along entire neck edge, stitch it to the neck edge, right sides together.

Clip seam allowance at the curves and turn the binding to the inside.


Next you want to turn in the raw edge of the bias strip. We find it easier to turn in the raw edge here before you turn the bias strip to the inside of the bodice. 1/4" pressed in will do the job.

Now, when you turn the bias to the inside, that outer edge is already to go!

Next, stitch the bias facing in place by hand or machine. We machine stitched here for speed but got a crap result the first time.

Unpicked that hot mess and hand basted the bias facing.

Machine stitching the bias facing in place round 2 went much better. We stitched from the center back down to the waist and then repeated for the other side. Nice and smooth this time!
That's all for this installment. Next time we'll attach the Waist Insets and the Skirt Pieces.
TLC Sew Along Introduction - Fabrics and FBA May 03 2018 2 Comments
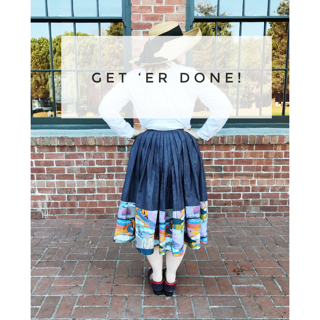
Get 'er Done (Part 6 - Final Post) November 01 2017
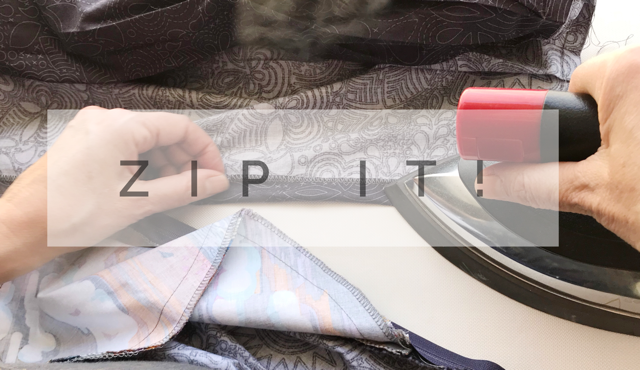
Zip It! Part 5 October 29 2017
Pleats! For Reals! Part 4 October 23 2017
Bait and Switch (Part 3) October 22 2017
Odds and Ends - At the beginning! Part 2 October 18 2017 3 Comments
A Sew Along is Announced! Part 1 October 12 2017
Admittedly, the Decades blog has been a seriously neglected child for most of this year. We're going to rectify that with a Chore Skirt Sew along. Please tell anyone you think might be interested! This is going to be fun and in the end, you will have a very cool skirt! If you need to purchase the pattern, just click on the image below.

We don't have a specific schedule for this sew along. We will try to get something posted every week or even twice a week if possible. You guys can work at your own speed and the posts will be here for you to read at your leisure.
So here we go! Let's talk a bit about fabric selection for this project. The list of suggested fabric on the pattern cover includes:
- cotton (quilting cotton is fine. Don't choose anything too heavy - you'll see the explanation for that below)
- mid or lightweight rayons
- seersucker
- double gauze
- shirtings
- lightweight ikat
- chambray
- fine wool suiting
- tropical weight wool
It seems a bit like an everything-but-the-kitchen-sink fabric list! Ultimately, fabric choice for the upper skirt is determined more by bulk and weight of the fabric over any other characteristics. At the center back of this skirt, there are 4 layers of the fabric in stacked pleats. Those 4 layers are bound with the waist binding creating a total of 6 layers at the center back.

There are MANY fabrics not listed in the suggested fabrics that you could use for the upper skirt. The best way to determine if a fabric will work is to stack up 6 layers of the fabric you are considering and see how bulky it is. Let that be your guide in choosing the upper skirt fabric.
The Skirt Band at the bottom of the skirt does not have any construction elements limiting your fabric choices. So far, we have stuck to using fabric that is similar in weight and drape to the upper skirt and have been pleased with the results. You can use fabric that is a bit heavier or bulkier than what you choose for the upper skirt and everything will still work out fine. Something like velveteen or corduroy could really make for a lux bottom band! Striped silk blend suiting next to cotton velveteen shown below can give you an idea of how striking that could be!

Hopefully one of you will give that a try and let us know how you like it!
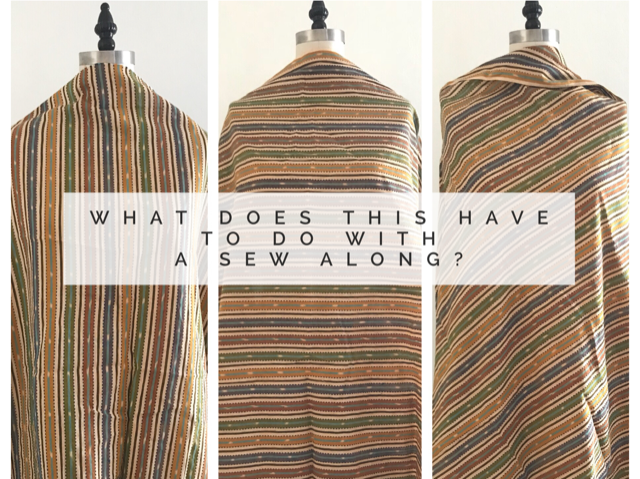
In the interest of actually getting this sew along off the ground, we'll end here with some inspiration photos.


The upper skirt on this yellow beauty is made from a textured mystery cotton. It had a bit of bulk to it but is worked out fine in the end. The Bottom Band is a hypnotizing ikat that came from Turkey.
Your assignment for the next post is to choose your fabric! And then choose your pattern size based on your waist measurement. Trim or trace your pattern pieces as you like and cut out the skirt. It doesn't take long; it is mostly simple rectangles.
Next time we'll cover piecing the Skirt Front and Front Band for sizes 14 and up (for 44" fabric) for those who have never come across this in a pattern before. And we'll touch a bit on the importance of stabilizing the waist edge of the skirt.
Thanks for joining us!!
Click here for the first installment in The Sew Along.

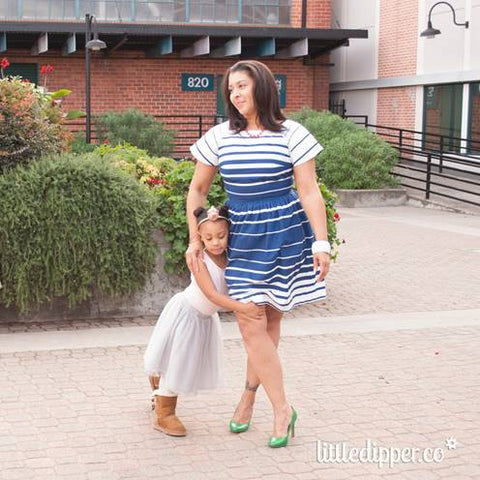
Guest Blogger LittleDipper.co: Ciao, Decades! Little Dipper is so pleased to meet you! February 21 2017 2 Comments
Today we have a guest blog from Emilie and Adrienne, owners of locally owned LittleDipper.co fabric company talking about designing fabric for your sewing projects. They made a beautiful E.S.P. Dress using their Preston Stripes. They used poplin for their ESP Dress. Poplin, most commonly used with cotton batiks and favored by quilters, is known for its crisp hand and stiff drape.

We are a fabric company based out of Berkeley, CA. Because we believe that fashion and style have no minimum or maximum size or a perfect shape, we are super excited about Decades of Style. We love that Decades patterns offer a full range of sizes. Some of us have curves and some of us don't and all that makes us is women. Whether you are a size 0 or a size 20, the best way to walk through life feeling like a million bucks is for your clothes to fit the skin you are in, as it is! Decades Everyday patterns fit great and allow you to make adjustments based on your curves. Hmm...clothes that fit. What a concept!
We (LittleDipper.co) are a fabric company, but, we are so much more than that. We are supporters of beauty and style and creative choice. LittleDipper.co fabric is created by independent artists. Any fabric created through LittleDipper.co, has been selected by you......our fabric loving consumers. Artist submit their designs to us, we curate and present them to you, and you decide which designs you want to buy. We provided the fabric, the patterns and the inspiration and let you make (or have made) what you want. Haven’t you ever seen a dress and thought, “ I would totally love a table runner in that fabric”; or a pair of curtains and thought, “Oooh, that design would look great on a pair of pants”? At LittleDipper.co, we want to provide you with the flexibility to create what you want, when you want.

So, how does it work? I'm glad you asked... Design of any kind, whether it be fashion or furniture, only allow us to purchase what they deem “in”, or “out”, charging top dollar and only discounting items that don’t sell. Incentivizing us to waste money on things we really don't want or need. Unlike the mainstream retail market that only discounts the unwanted, or less desirable products; We produce limited edition, small runs of the highest quality, and award the best price to the early bird, who make a purchase within the first 7 days of a design going live on our site. Once a fabric design has been presented on LittleDipper.co, it is available for pre-order, and pre-orders are everything! The magic number is 300. An artist's design must be popular enough to get at least 300 pre-ordered yards, before we will produce it. If you pre-order a design and it doesn't make it to 300, your credit card will not be charged.
We so appreciate the opportunity to say hello to the Decades of Style community and hope to encourage a trend towards great fitting clothes, and a super stylish lifestyle, one yard at a time! Thanks for reading and here's a little something from us; save 10% on your first fabric purchase on Little Dipper when you use the code: LoveDecades
~Emilie D. & Adrienne W.
Please check us out on your favorite social media outlets; share, post and let us know what inspires you!
• facebook.com/spark.
• instagram.com/golittledipper
• twitter.com/golittledipper
• pinterest.com/golittledipper
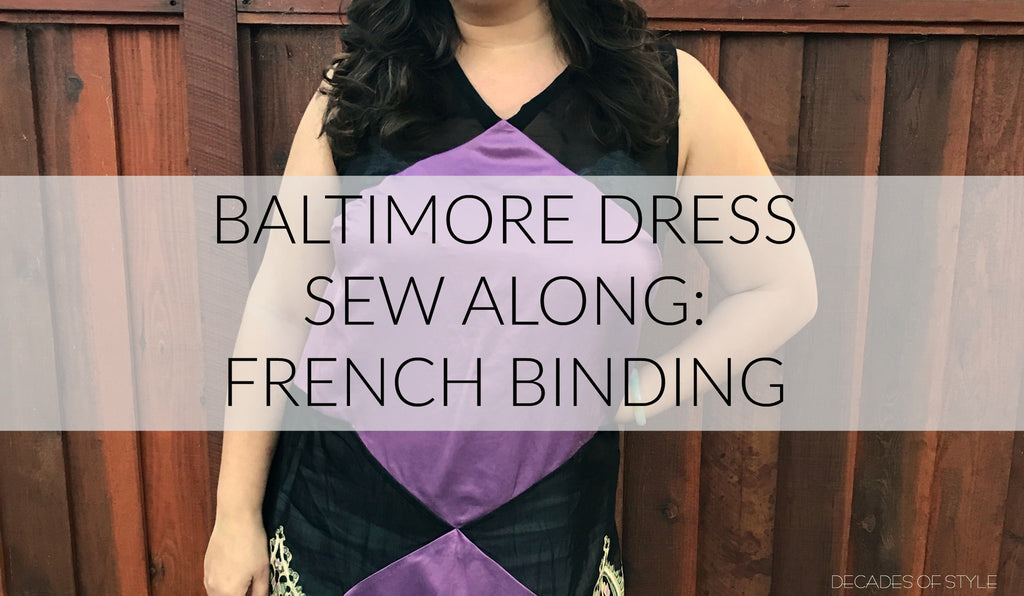
Baltimore Dress Sew Along: French Binding February 13 2017
Sorry for the long wait in between blog posts. We worked really hard to release a trio of pattens at once and then promptly contracted the plague. Seriously, we all went down with a variety of ick from sinus infections to the flu. But at least it was possible to enjoy the enthusiastic response of all of you to our new patterns! We are grateful for all of the excitement shared by our customers and followers on our social media. It makes us anxious to get on to the next round! (1930s anyone?)
But first, let's finish with the Baltimore Dress.
Now that the bias seams are stabilized and the front part of the dress is sewn together, the rest of the dress is very straight forward starting with shoulder darts on the Dress Back. Sizes 30, 32, and 34, require a continuous neck placket. Sewaholic has a great tutorial on sewing a continuous neck placket to give you a detailed look at this process.
Next step is shoulder seams. We reinforced the shoulder seam with Design Plus stay tape just because our fabric was so lightweight and the shoulder seams can be stressed by the weight of the garment, and therefore pull.

We used French binding to finish the neck and armhole edges. Mais, qu'est que-ce? Most people use the the technique illustrated by Tilly and the Buttons, where the bias encompasses the raw edge and is visible on the finished garment. You can use this technique if you like; it is perfectly accurate to 1920s finishing options. You can use the same fabric or a contrasting fabric. Ultimately, we decided on French binding for finishing the edges because the binding is not visible on the finished garment and therefore has a "cleaner" look.
We like to make our own bias as it allows us to control the width and weight of it. The store bought stuff tends to be stiff (often a cotton/poly blend) and never seems to behave quite right. For this Baltimore Dress, instead of using the very lightweight silk/cotton fabric of the dress, we used a black cotton voile. It is lightweight enough to mold easily and yet stiff enough to act as a stabilizer. If you are using a loosely woven fabric, like a chiffon, make your bias at least 2"-2 1/4" wide as chiffon blooms quite a bit when on the bias. MADE EVERYDAY has a comprehensive tutorial to making your own bias. (She uses a bias maker, the tool you use to fold and press the bias tape, which we didn't use this time around.)
Once the bias tape is made, head to the ironing board with the dress and bias tape. The bias tape needs to be shaped to match the curve of the armscye.

Pre-shaping the bias keeps it from pulling, puckering and twisting through all the steps involved: stitching it to the dress: turning and pressing the binding to the inside and finally, hand sewing it into place.
HAND SEWING?! Yes. It is SOO worth the time and effort to up your couture sewing game and achieve a result that matches any authentic vintage garment out there. To sew the facing in place as invisibly as possible, use a running or whip stitch where you only grab 2-3 threads on the right side of the fabric and then take a medium to small stitch on the wrong side of the fabric.

The process of French binding is the same for finishing the neckline. If you want a detailed explanation on binding for garments, Victory Patterns has a great tutorial on the the two types of bias binding by machine.

We hemmed this particular skirt by hand. The Skirt Front Panel has some bias so hemming it by hand gives you the most control. We tested this pattern in a firmly woven lightweight shirting fabric and had great success using a rolled hem foot and hemming it on the machine. Stay-stitching the bias curves before putting it through the rolled hem was the key to getting a nice result.

The Baltimore Dress is so versatile, it can shift effortlessly from a serious 1920s themed event to daily wear with a simple change of accessories and hairstyle. We hoped you enjoyed our sew along and we can't wait to see what you make!
- Page 1 of 2
- Next