Click here for previous installment in the sew along.
Let’s jump right in and get the bib on these babies!
Make the Bib Pocket by turning back the top edge along the foldline (A) and stitching up the sides(B). Turn it right side out and then press in the seam allowance on all the remaining sides (D_E). Stitch top edge in place (F).

Finished Bib Pocket:

Before you start working on the Bib and manipulating it, stay stitch the curved edges right along the seam line So they won’t get stressed or distorted while you’re working. (The stay stitching is hard to see because the thread color matches the fabric.)

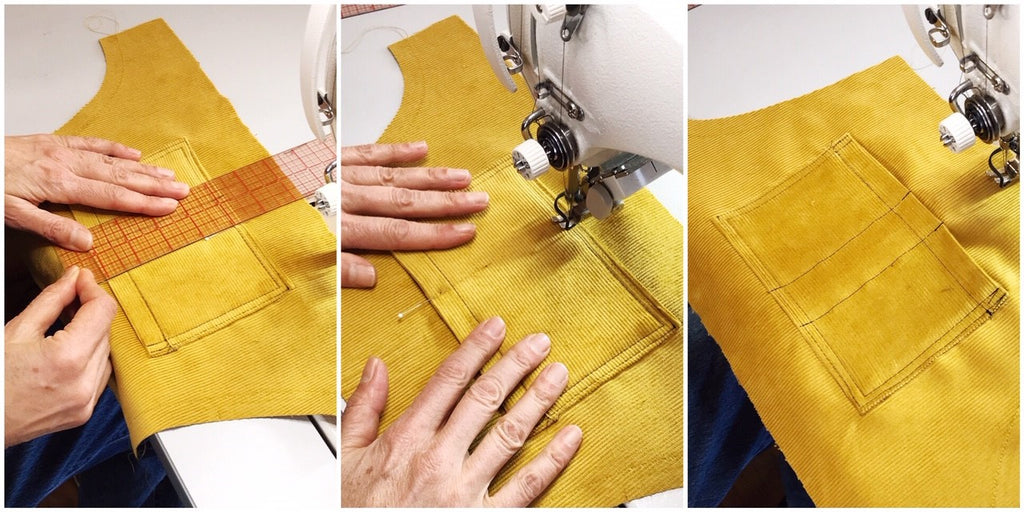
Mark the Bib Pocket placement lines on the Bib. We used an awl punch hole just inside of the placement lines so the Pocket covers the marks (a-c). Place the pocket on the bib and glue-baste or hand baste the pocket in place (d). We glue basted the Pocket and it did shift a tiny bit while we were stitching (hand basting it is always the best). Edge stitch and topstitch the pocket in place (e-f).

If you want, use stitching lines to divide the pocket into sections. A clear 2 inch ruler can be used to mark your stitching lines.

Next ,pin the Bib to the front edge of the waist, right sides together, matching center fronts and matching the notches to the princess seams (1). Stitch seam (2). Trim the seam allowance on the Bib only and press the seam towards the Bib (3-5). And edge stitch and topstitch the seam on the Bib (6).

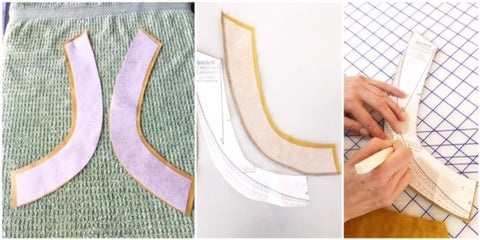
Now we’re going to use the facing to finish all the edges of the Bib and the front opening on the overalls. First, interface the Bib Facing pieces, trimming 3/8" off the notched edges and fusing to the corresponding bib facing pieces. Finish the inner and lower edges (right). We rounded the inner curves on the Bib Facing piece to make it easier to put through the serger.

Stitch the Bib Facing right sides together at the center front. Trim the seam, press open.

Pin Bib Facing to Bib, right sides together. Stitch Facing to the Bib, starting from lower notch on the Facing to lower notch on the other side.


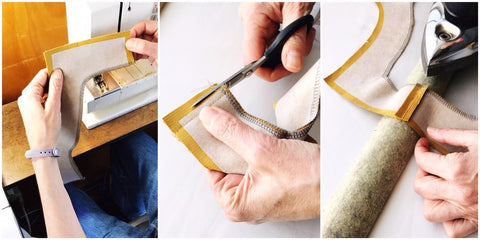
Clip corners (left). Grade the seam allowances so that they are graduated in height and the shortest layer is closest to the body (center). Clip seam allowances along the curve (right).

If you have a point presser, this is a good tool to use it to press the seam open before turning the Facing right side out. This makes the edge along the seam much easier to control once you’ve turned the Facing right side out.


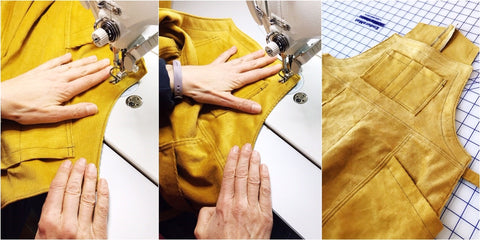
Edge stitch the seam from lower notch to lower notch.

Top stitch the Bib approximately 1" from the edge as shown, starting at the waist and stitching to the waist at the other side.

Now we can attach the Back Button Plackets. With the right sides together, stitch the top edge. Then turn them right side out. If your fabric is not too bulky, you don’t need to clip the corner (left). Just fold the corner down and hold it in place pinched between your thumb and your forefinger as you turn(center).

Press and serge the bottom edge. You can serge the sides at this time like we did or you can also wait until you attach the Placket and serge the sides along with the Pants.

If you haven't done so yet, mark the notches on the Placket (left). Center photo shows the notch at the side opening. Match the lower notch on the Placket with that notch at the bottom of the side opening (right).

Match upper edge of Placket with circle at waist (left - the circle is marked with a tiny awl punch that doesn't show in the photo. Just note that top edge of the Placket is offset from the corner by 5/8"). Placket pinned in place at side opening (center). Stitch between the lower notches and the circle at the waist edge. Press all the seams towards the back (right).

Stay stitch the curved back edge right along the seam line. The stay stitching is in matching thread so it is not easy to see but it is there.

Prep the Back Facing pieces exactly as you did the front, trimming the interfacing and fusing it to the corresponding pieces (left). Finish the inner edge (center). Mark where the back princess seam will match the facing (right).

Pin Back Facing to the overalls right sides together matching the reference marks and notches (upper left). Stitch from circle at waist edge of facing - the location of the circle is the pin (upper right). Grade the seam allowance in the same manner as the Bib Facing (lower left). Clip the curve (lower right).

Press the seam open (upper left). Turn under the seam allowance at the short end that abuts the Button Placket (upper right). Turn the Back Facing to the inside and press (bottom row).

The Back Facing will look like this after pressing:

Edge stitch the facing (left). Topstitch 1" from edge securing the Facing in place on the inside (center). The back edge is finished now and will look like the photo at the far right.

Let's finish this installment up with anchoring the Button Placket and Bib Facing to the overalls.
Lap the front edge of the waist opening over the Button Placket and pin the opening shut as shown (upper left). Pin the bottom of the Bib Facing and the Button Placket in place . It makes it easier to deal with if you hand baste everything at this point (upper right). Mache Stitch through all layers at the level of the lower notch anchoring the Button Placket and the Bib Facing to the side front trousers (bottom row).

You made it through another long installment!! All that is left now is the Straps and the finishing steps. Join us next time!
Click here for the next installment in the sew along.

